How can we help you?
Create an Agenda
To begin, create an agenda to easily plan and structure your next meeting by following these easy steps.
Create an Agenda
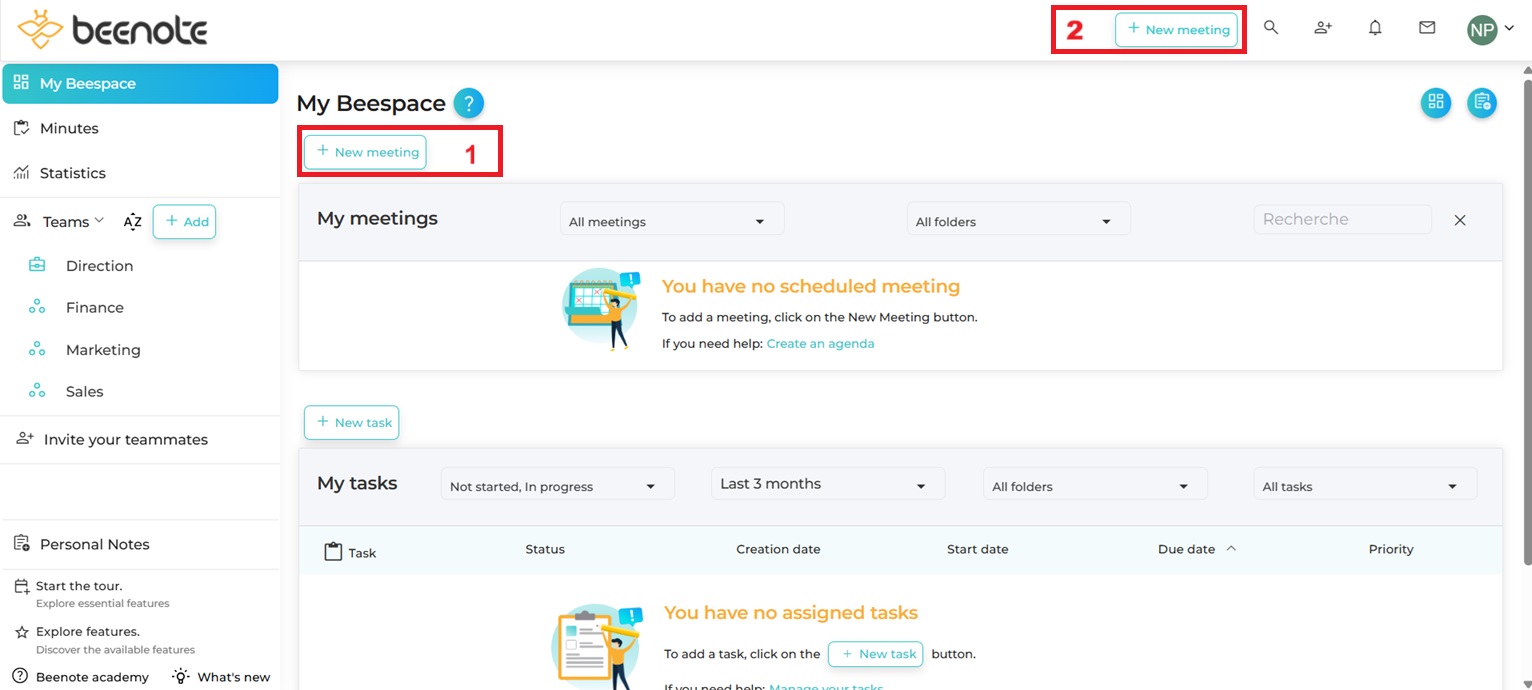
First of all, you have two ways to create an agenda: click on the New meeting button in the top of My meetings when you are in your Beespace (1) or in the top bar of your page (2). This one is always available when you navigate in Beenote.
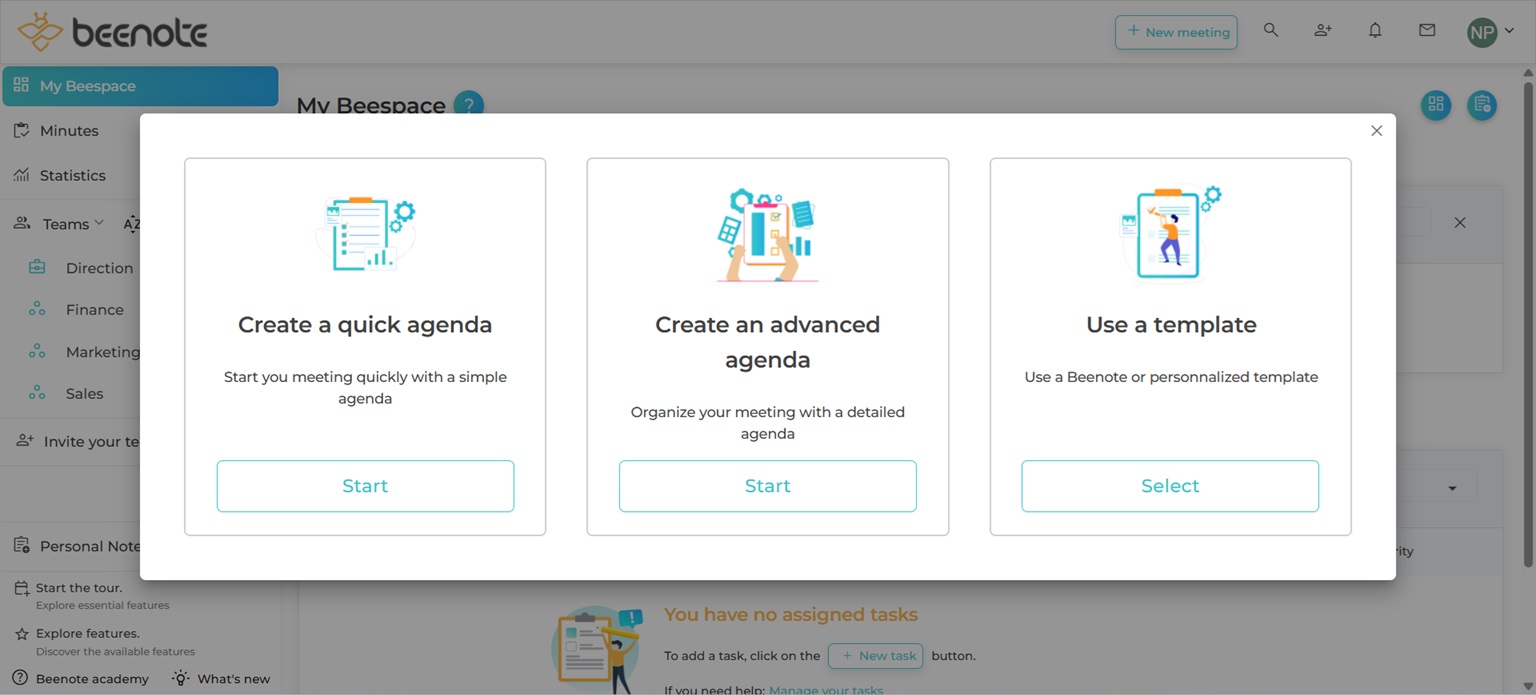
When you click on New meeting button (2), you can choose to create a quick agenda, write an advanced agenda or use a template.
Write an Advanced Agenda
For meet later, you must plan an agenda that will allow you to organize an effective meeting that respects all good practices.
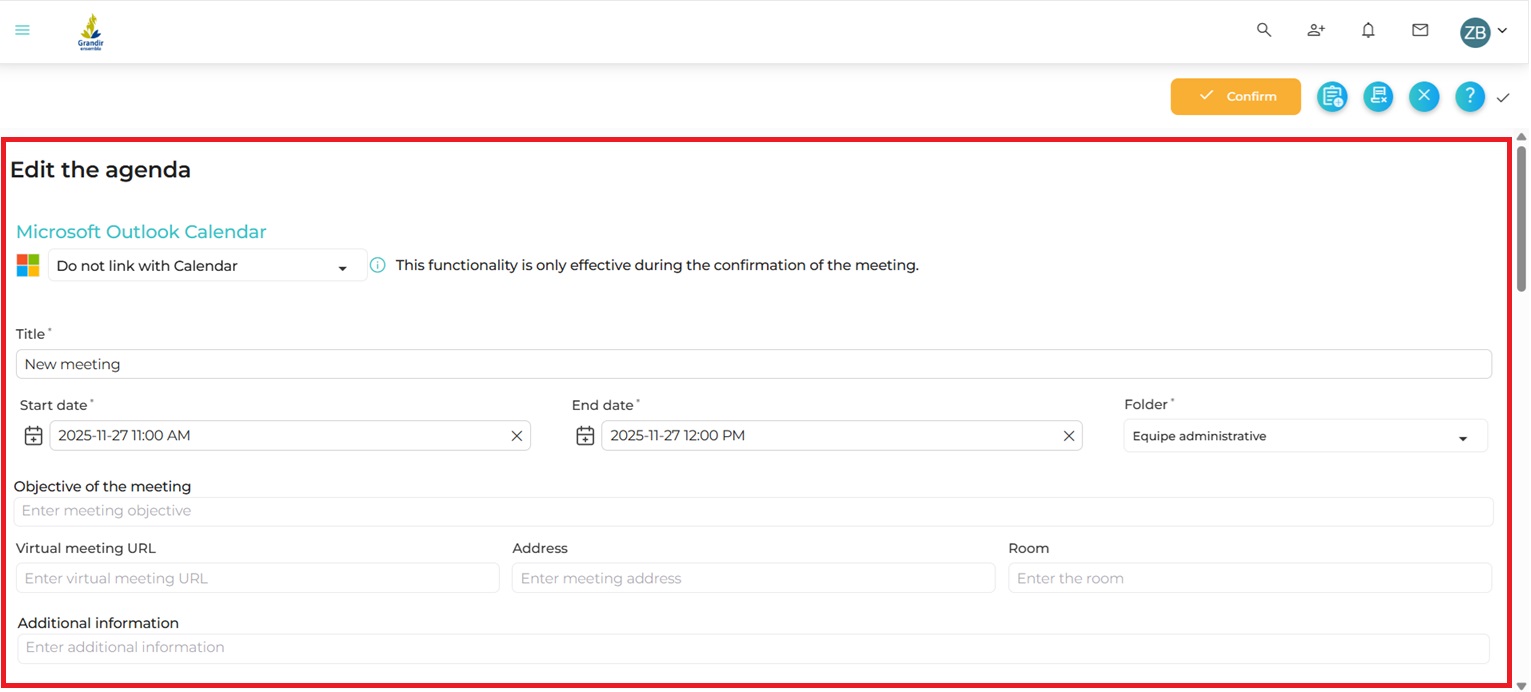
1. It is imperative to first indicate the basic information about your meeting.
- The title of your meeting.
- Folder to which the agenda is linked.
- Duration of the meeting: by default, the time allocated to the meeting is one hour, because the ideal estimated time of a meeting is between 30 minutes and 1 hour.
2. Then, indicate the meeting address, room, and any other information you need.
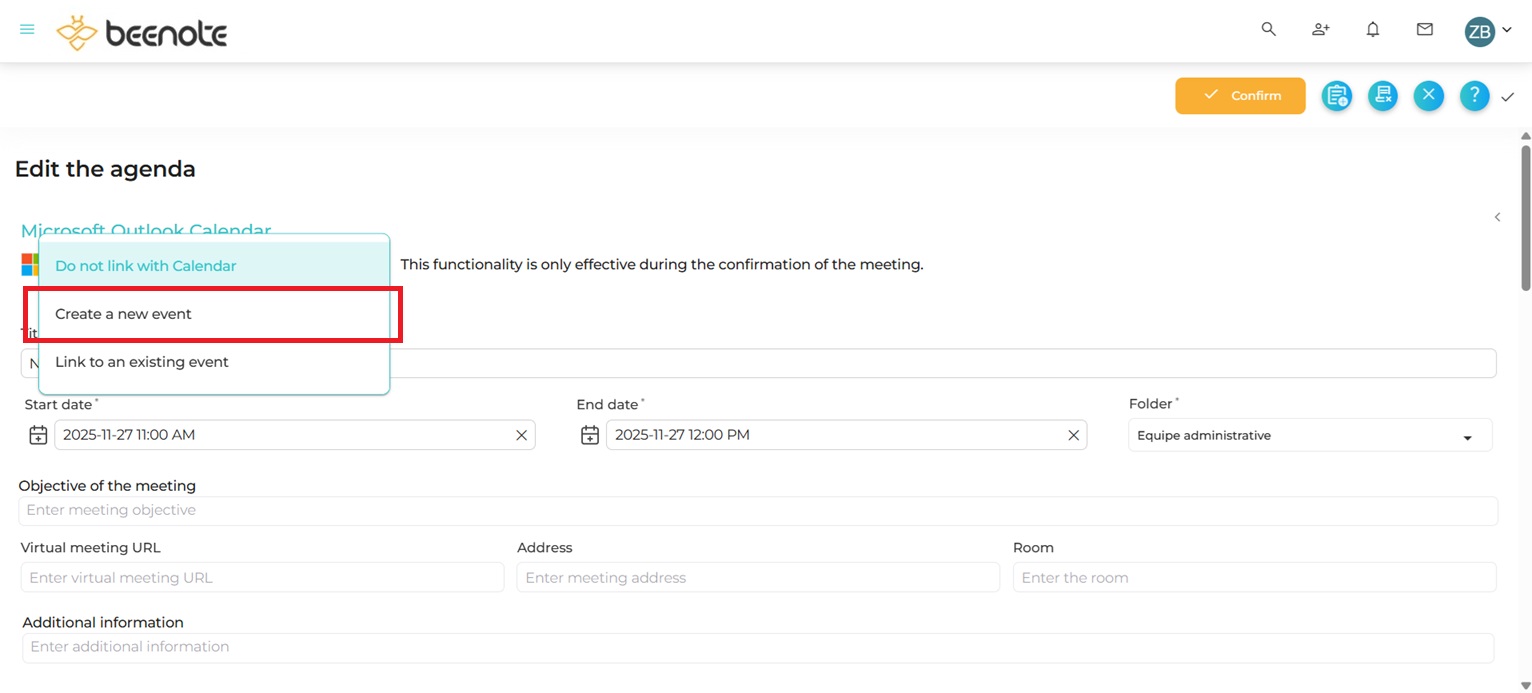
To associate the meeting to your corporate calendar, you must click on Create a new event as in the image below.
Remember that you must log in with one of the two integrations to use this feature.
Calendar association or not: Integration with Microsoft Outlook Calendar or Google Calendar.
Meeting Roles
Firstly, before you can assign roles, you must invite your teammates to join your team. Then, it will be easy to add them, with their email address.
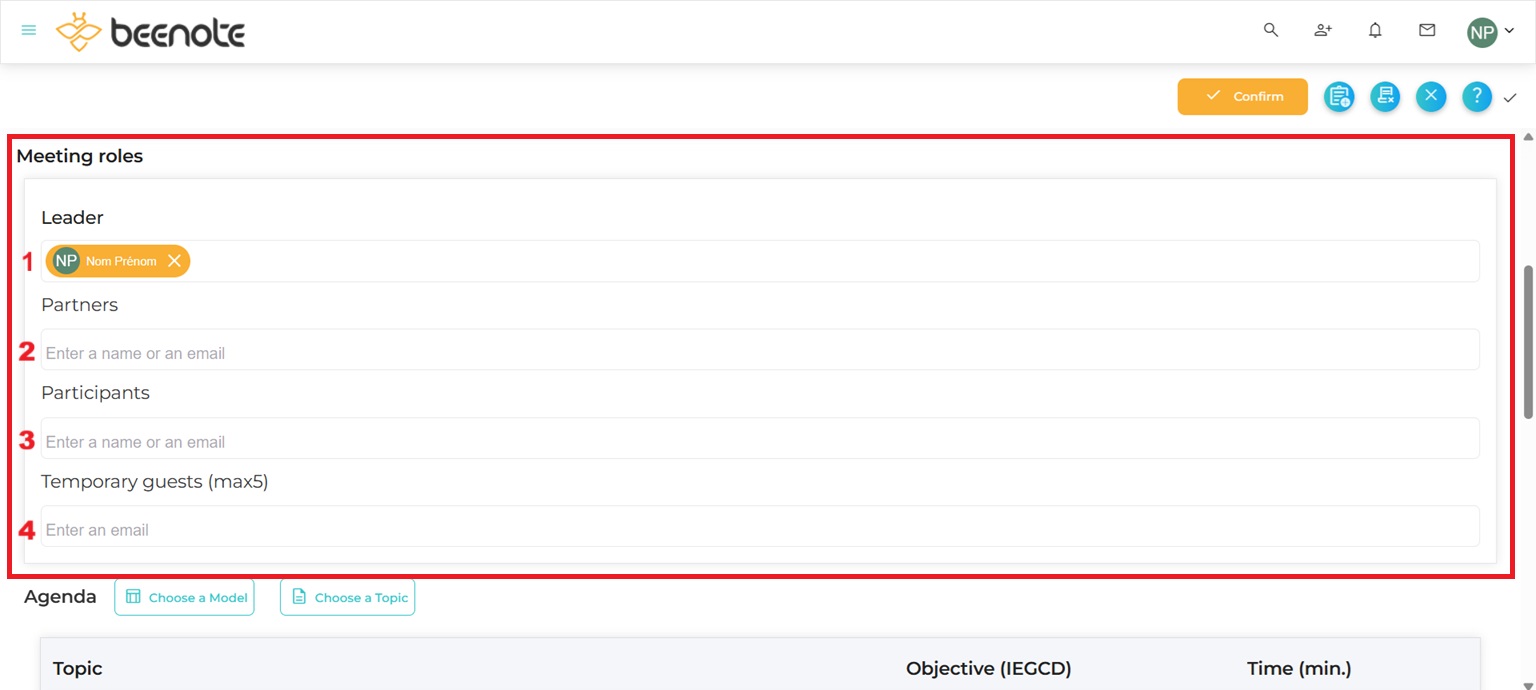
Whoever creates an agenda is usually the Leader (1). You can, however, change this role to assign it to another person.
As well as, three other roles of importance:
Partner (2): the one who assists the leader of the meeting execution.
Participants (3): users who attend the meeting with less permission during the meeting.
Temporary guests (4): those who do not have a Beenote account.
Learn more: Meeting Roles
Invite Teammates to the Meeting
Then, during the meeting planning, a section is intended to invite your teammates, according to their role in the meeting.
Naturally, the interface is very user-friendly: type the beginning or any part of the name of the desired person, and a list of choices is offered to you.
Avatars allow you to quickly locate desired people.

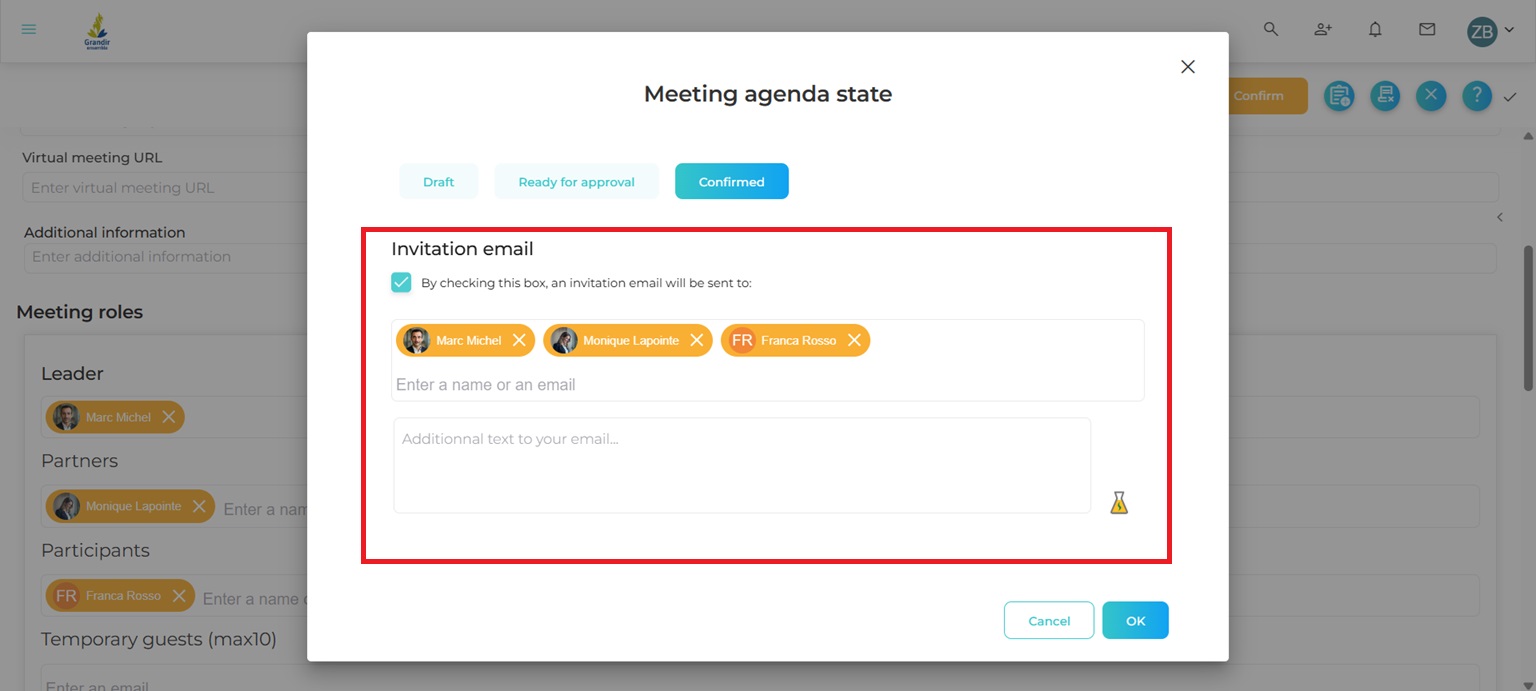
At the end of the meeting planning, all these people will receive an invitation by email.
This email contains two important items:
- a link to the Beenote meeting
- the electronic invitation to update the agenda
The first element is a link to the meeting in Beenote. At the time of the meeting, the guests will only have to click on the link to be instantly in the meeting. They will also be able to go to the meeting via their Beespace.
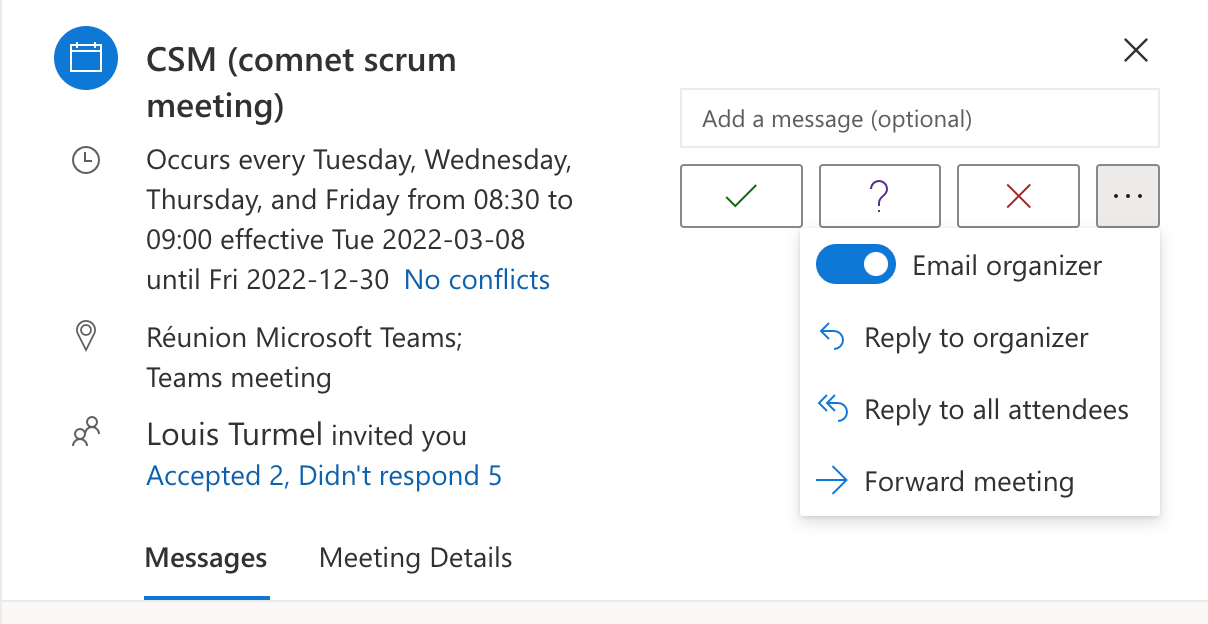
The second element contained in the email is the electronic invitation that will be used to update the guests’ electronic agenda if desired.
Learn more : corporate calendar integration with Beenote
Don’t forget: to send an email invitation, you have to check the corresponding box at the end of planning.
Electronic Invitations
Since emails are used to integrate the Beenote meetings into the guest calendars, you must always send an email when a meeting schedule is changed.
Subsequently, this keeps the calendar synchronized with meetings scheduled in Beenote. In addition, guests will receive an email to notify them of the change.
So, remember that when sending the invitation, you will have the opportunity to add an additional comment, which will be included in the invitation email. This is a possibility to indicate the latest guidelines for preparing for the meeting.
Finally, if you want a specific action to be taken before the meeting is held (for example, preparing statistics to be presented), Beenote offers integrated task management that will allow you to assign this task to the person in charge. She will receive an email notification, and the task will be assigned to his Beespace.
A related article: How to Decline a Meeting Invitation
Write the Agenda
Certainly, an effective meeting must have a game plan. This game plan is the topics on the agenda.
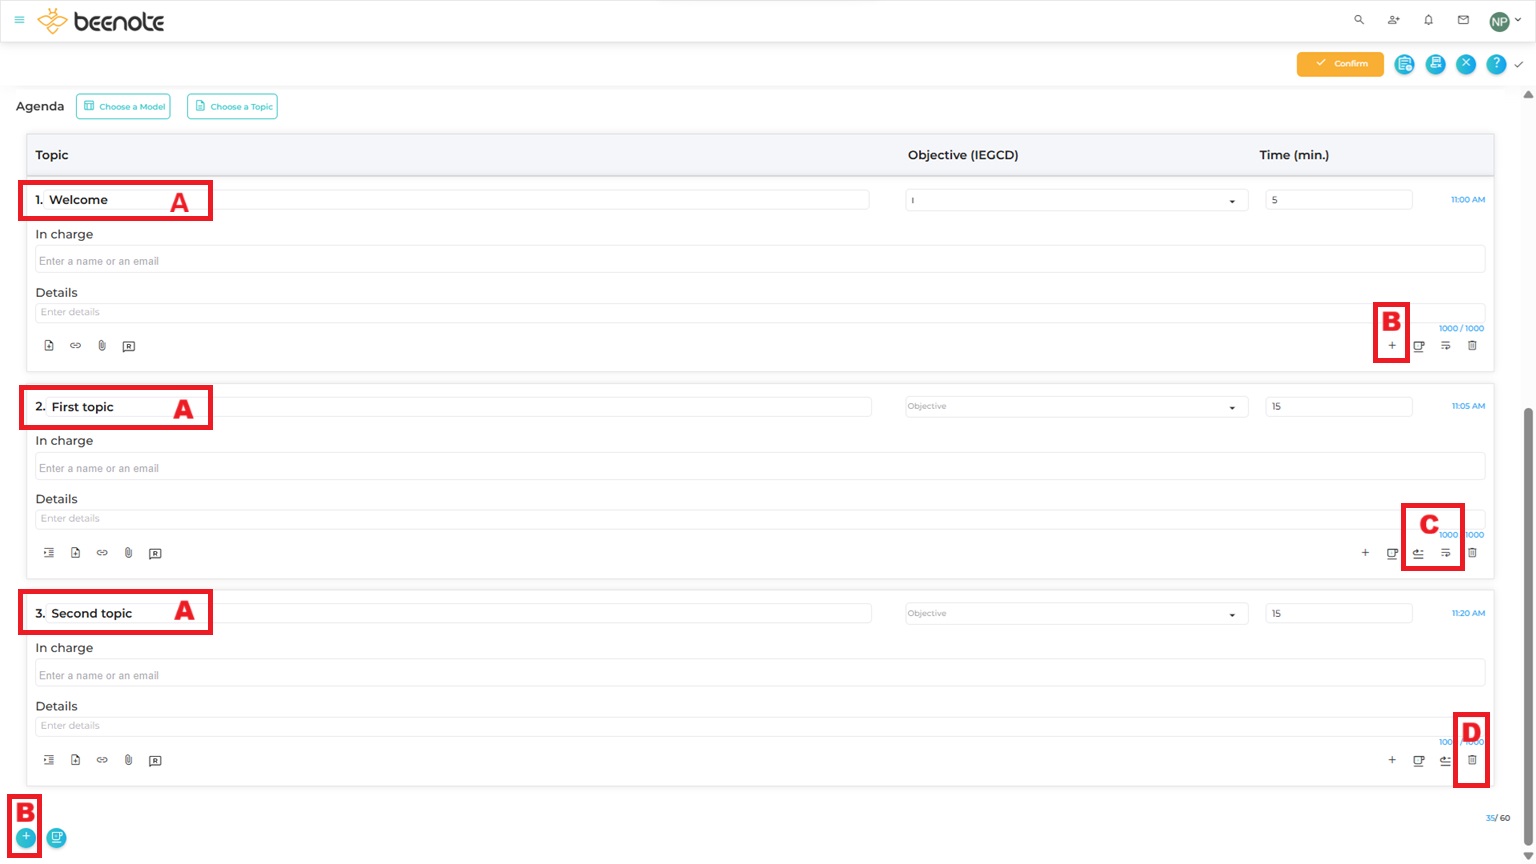
Automatically, Beenote creates 3 topics (A), but it is easy to add or insert one between two topics (B). You can easily move the topics to your liking (C) and even delete them (D). Topic numbering is automatic.
You can also schedule a break with the icon ![]() for a long meeting.
for a long meeting.
Moreover, Beenote allows you to configure each topic so that participants know beforehand the content of upcoming discussions.
Here are the basic functions for writing the agenda:
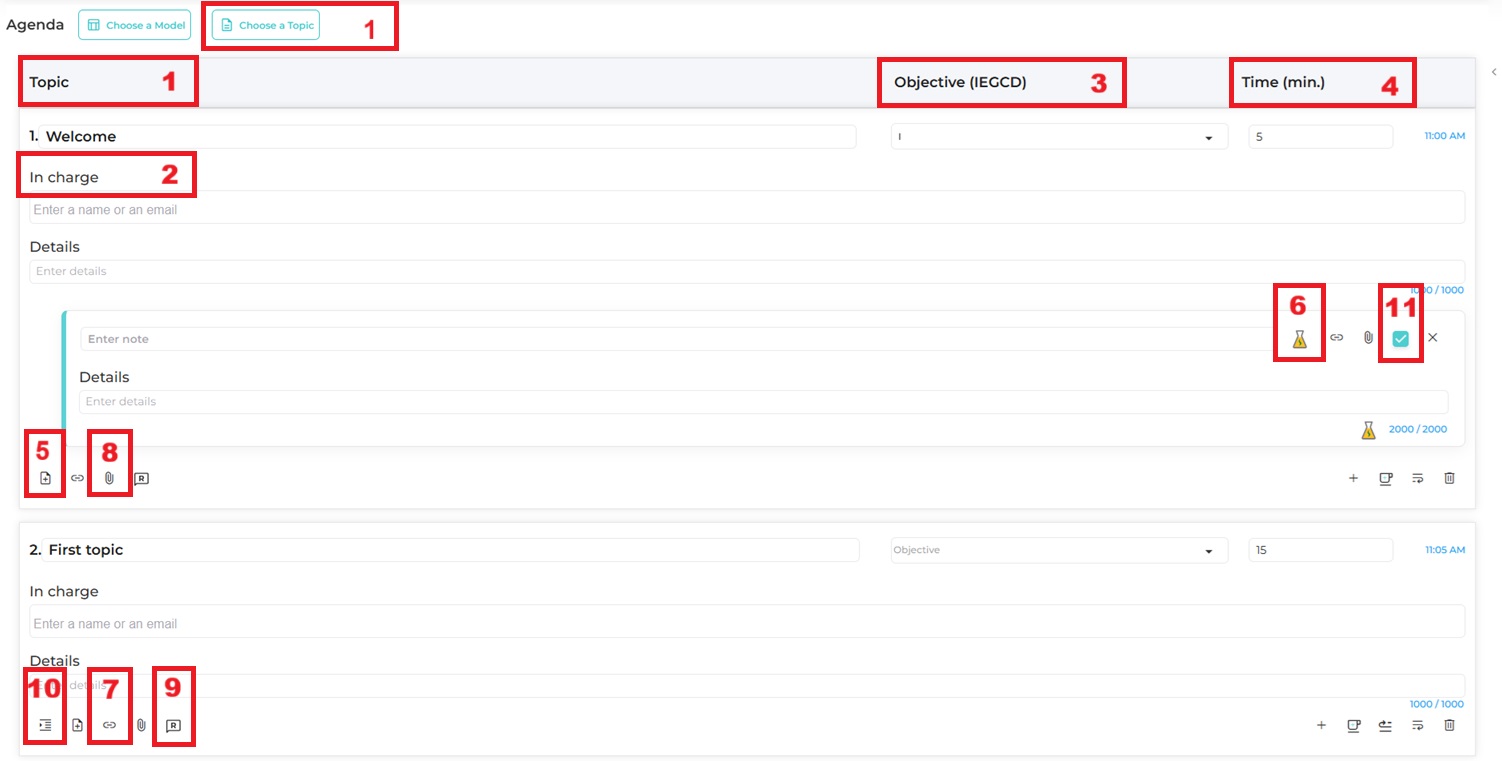
1. Name Your Topic
By reading the title, people must be able to understand what will be discussed. Likewise, they will be able to prepare themselves accordingly.
You can also add more details in the space provided.
With the Beeboard version, you have access to the topic register  where you can use your previously recorded topics. In addition, you can even postpone topics not covered during the meeting.
2. Assign a Person in Charge
In Beenote, it is recommended to assign a person in charge of each topic (2).
It could be the leader, but not necessarily. The person in charge of a topic is responsible for animating and managing the topic concerned. He must respect the topic time allocated.
In fact, knowing that he will be in charge, the participant will be well prepared to attend the meeting.
3. Define Objectives
Why are we talking about this? This is a very legitimate question and unfortunately too frequent question.
Now, by indicating the objective of each topic (3), people will know in advance how to prepare for it.
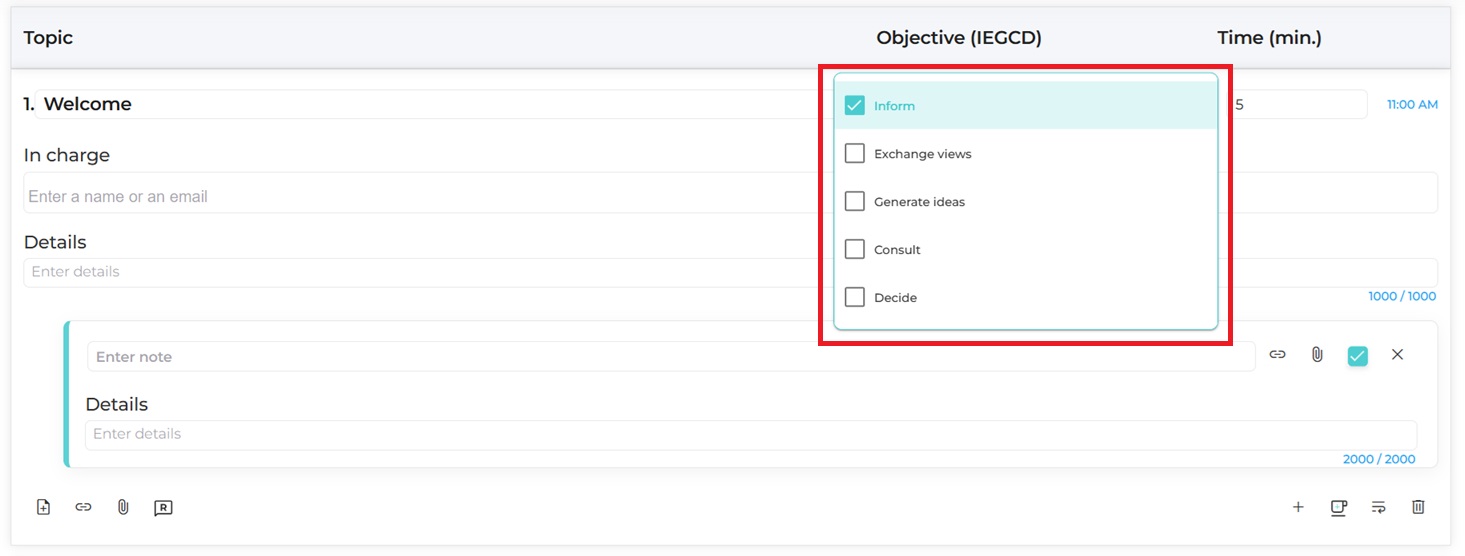
Beenote allows you to indicate the following objectives:
• Inform: Distribute information so that everyone aims the same goal.
• Exchange: Share information and knowledge about the topic.
• Generate idea: It’s time for a little brainstorm.
• Consult: Get feedback from participants on a given topic.
• Decide: main objectives of a meeting. During this topic, Beenote will record your decisions in the form of Decision.
4. Determine Topic Length
You will need to enter the expected length of each topic (4).
Beenote constantly indicates the total time for all the topics, as well as the expected length of the meeting.
Thus, you can easily assess whether the planned meeting is sufficient, or on the contrary, unnecessarily long.
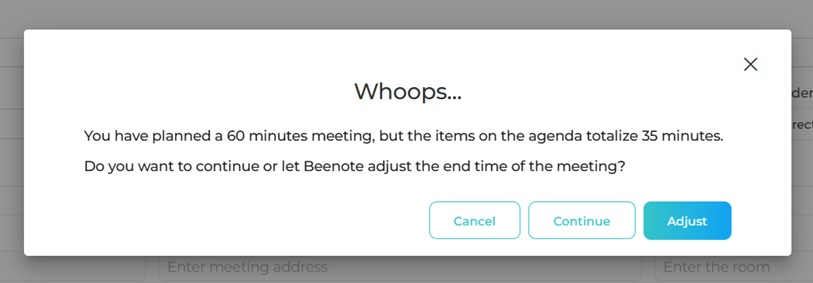
Also, Beenote goes to validate the planned vs estimated length and notifies you in case of inconsistency.
Knowing this, you will be able to adapt the content of the meeting accordingly, or allocate to the meetings only the necessary time.
Of course, having a reliable estimate of the meeting length also makes it possible to judiciously use the resources of the company and free the rooms for your colleagues.
In addition, to help the person in charge of the topic to respect the allocated time during the meeting, Beenote displays a timekeeper for each topic and notifies the participants when the time is up.
5. Add Additional Notes
Despite an explicit title, it may be necessary to give more details on a topic before the meeting.
Still, in order to get better prepared, Beenote offers a notes area for each topic (5).
The notes can also be used by the person in charge as a reminder. Don’t forget to talk about this or remind someone to do something. These are examples of very practical notes.
Combine with attachments, participants will have all the information they need to hold an effective meeting.
6. Correct Mistakes With Antidote
You can correct your typos easily with the Antidote button (6) for an impeccable agenda.
7 and 8. Insert Attachments
Why plan an agenda? Because people could prepare in advance. By attaching files and adding URL (7) links directly on each topic (8), Beenote allows you to share the same information with everyone.
Also, you have the possibility to link your URLs or important files that are in the Library (Beeboard only).
9. Add Resolutions
Prepare your resolutions in advance to include with your agenda. You can select a resolution from your register or create a new one. You can even add a vote inside. (the icon below)

Therefore, they can be either ![]() Adopt,
Adopt, ![]() Decline, or
Decline, or ![]() Postpone during the meeting.
Postpone during the meeting.
Note: this feature is exclusive to Beeboard. For more information about resolutions see Resolutions Management. With Beenote without Beeboard package, you can add decisions only during your meetings.
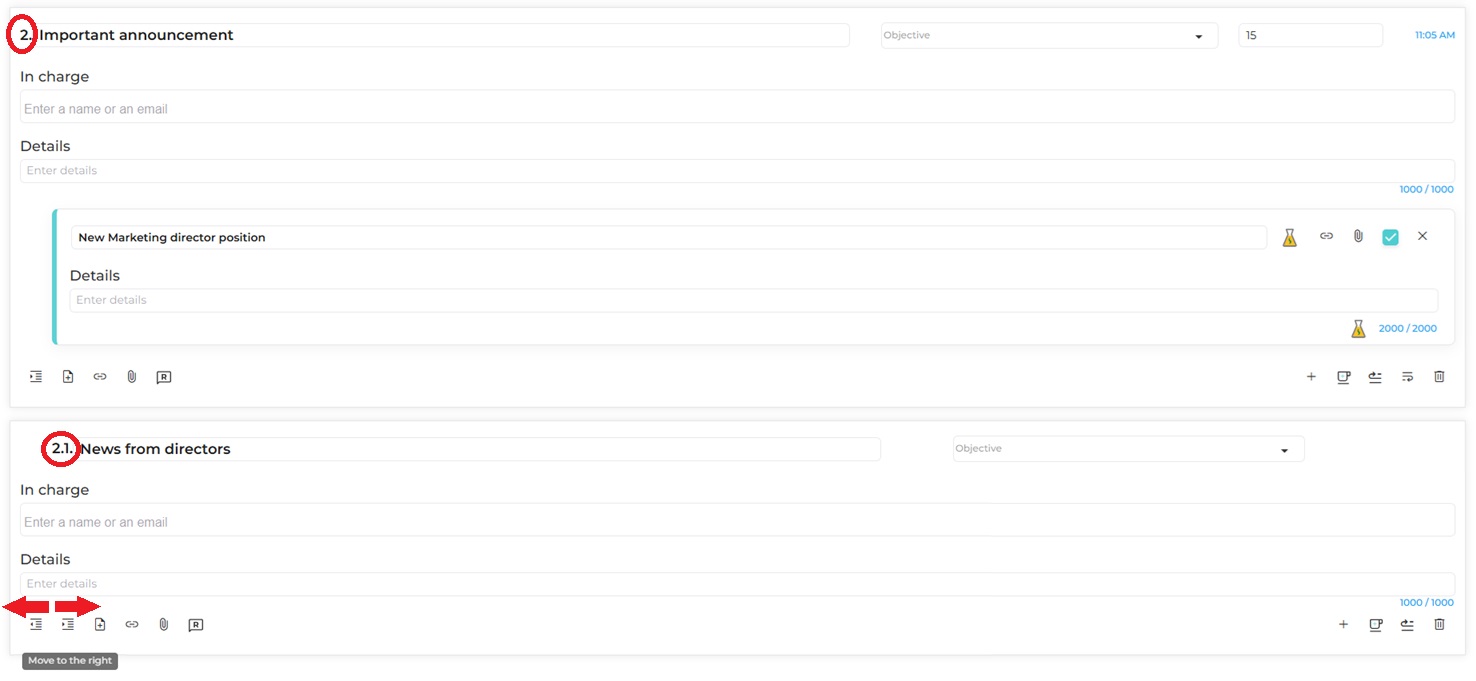
10. Create Subtopic
The subtopic function will help you to create a tree structure of types 1, 1.1, 1.1.1 and associate the documents and links to each of the points and subpoints.
11. Hide a Note or a Resolution
By keeping the box checked (11), the note or resolution will be visible to all participants when viewing the agenda before the meeting as well as during the meeting.
If you uncheck the box of a note or resolution, it will not be visible when viewing the agenda before the meeting. However, it will be visible when the meeting is started.
With the secretary mode activated and when a box has been unchecked, the content remains private during the meeting, therefore exclusive to the secretaries. The users with this role can make this note or resolution visible to all.
Note: the secretary mode is exclusive to Beeboard. Learn more about the secretary mode.
Complete the Agenda
Your agenda is now complete. You can save your own template or, set it in draft mode for other participants to enter their own points or confirm the agenda.
Create an Agenda Template
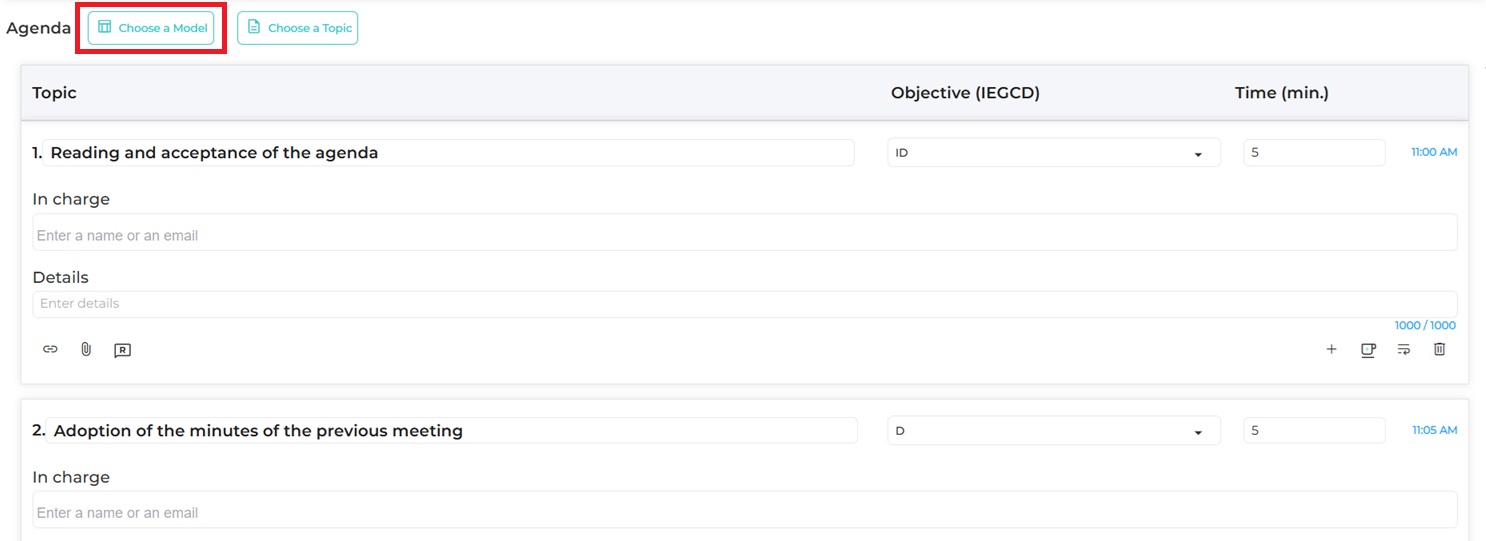
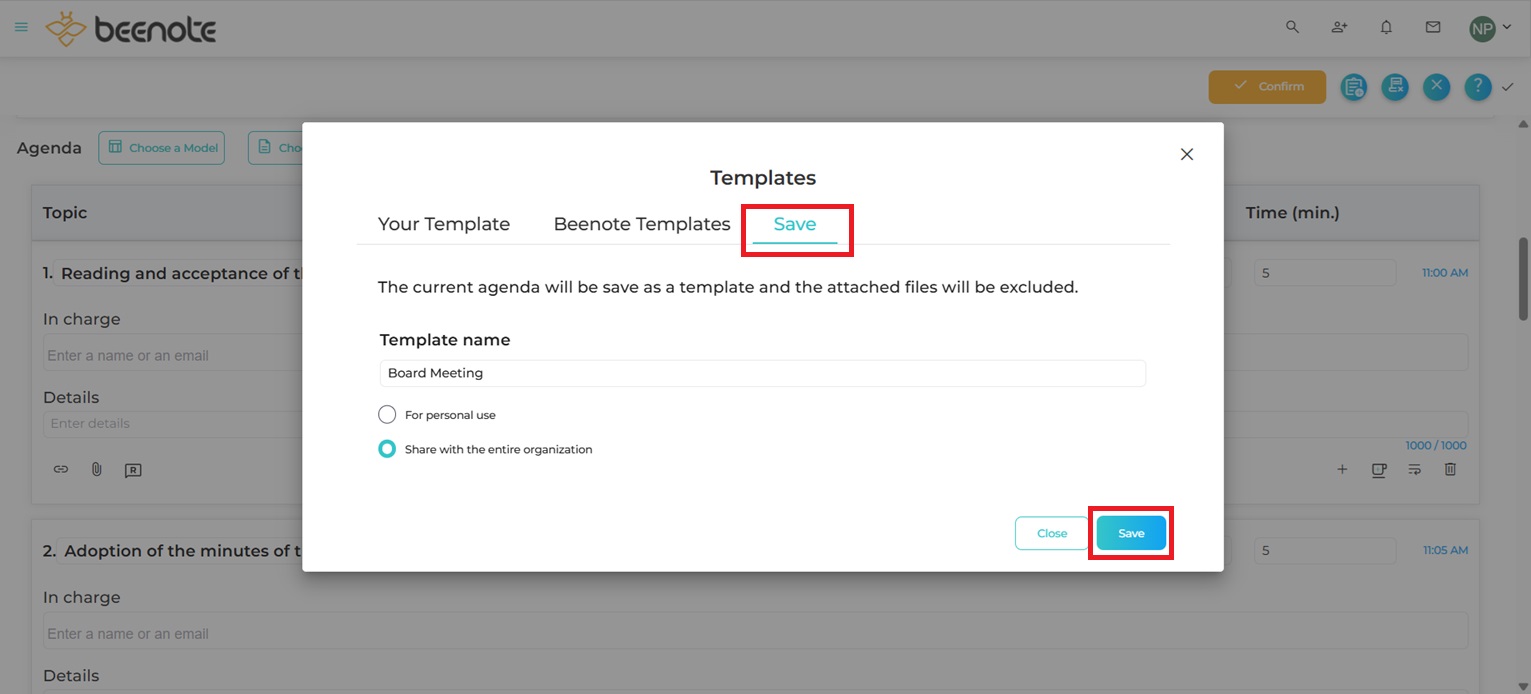
You can choose to save this agenda as a template for future meetings. Thus, it will allow you to save time during your next writing. Just click on the Templates button.
In the window, click on the Save tab. Then choose to keep it personal or accessible to your organization. Click on Save.
You will have access to your templates for future meetings in the same place, but by clicking on the Your Templates tab.
Save the Agenda
When the meeting schedule is complete, press the Confirm button.
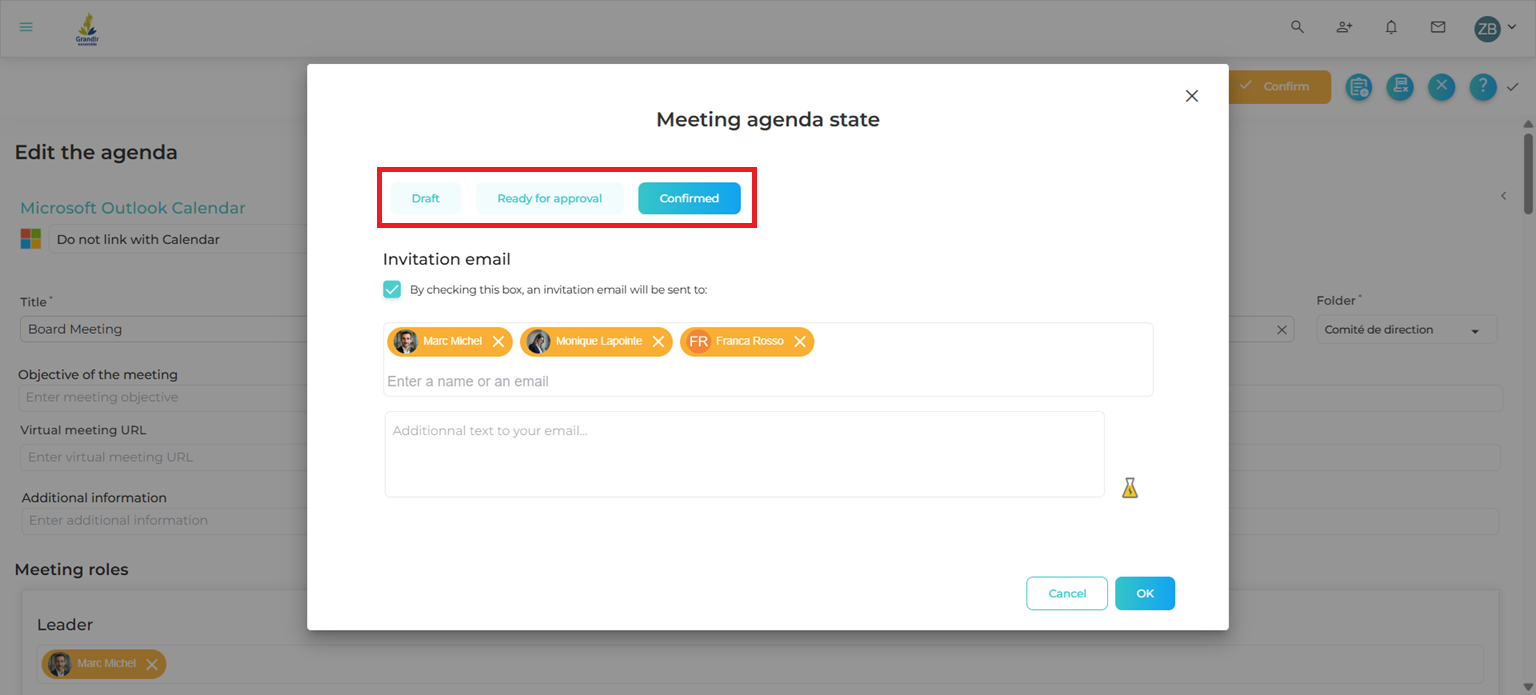
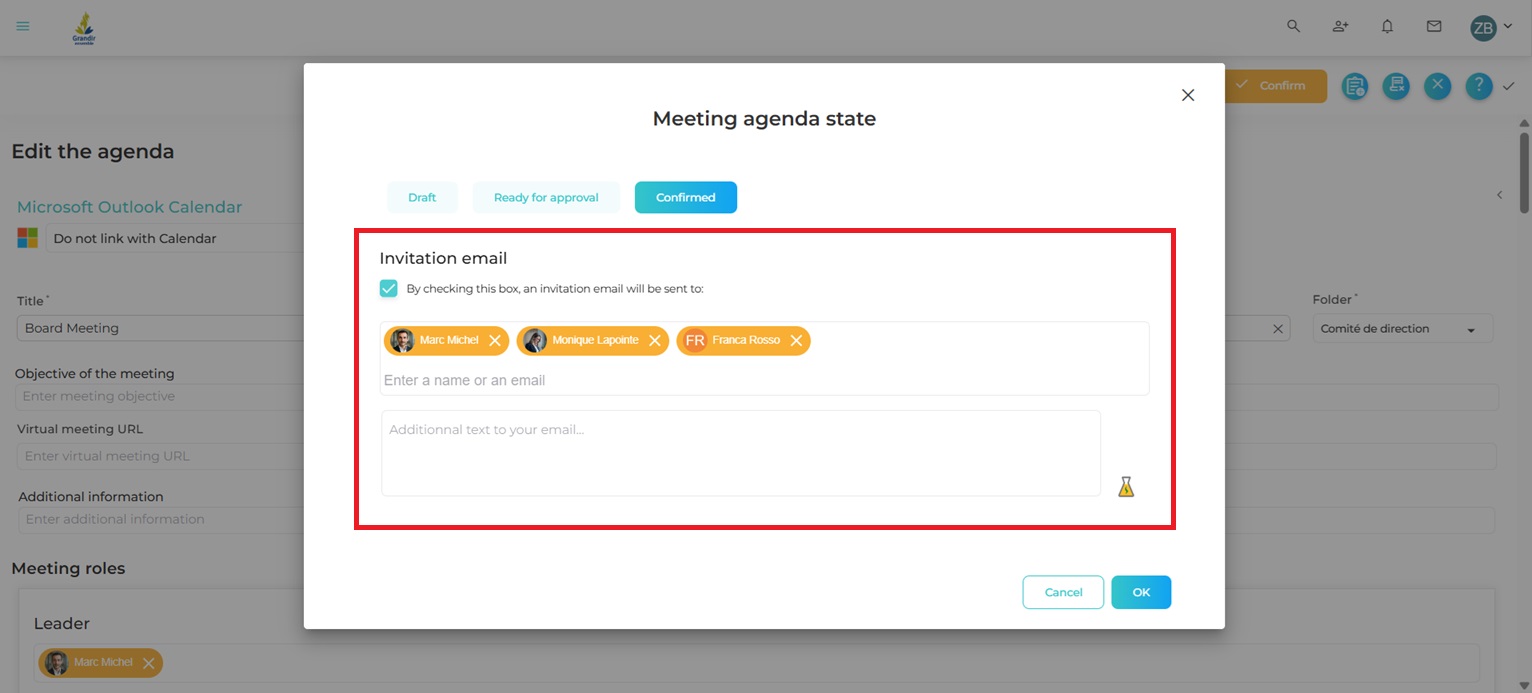
A window will appear. You can choose the status of the agenda by clicking on the draft or confirmed button.
Then you can choose if you want to send the agenda by email to all participants by checking the box. You can add other partners, participant or guest and also add a description.
Click OK and your agenda will be saved.
We recommend you send the invitation to your meeting when your agenda is confirmed, i.e. when it is ready for the future meeting.
Email invitations will be sent to stakeholders, who will be able to view the agenda, attachments, etc. The meetings will also be integrated into their corporate calendar and they will be able to indicate their intention to attend. Planning a meeting will allow everyone to be well prepared.
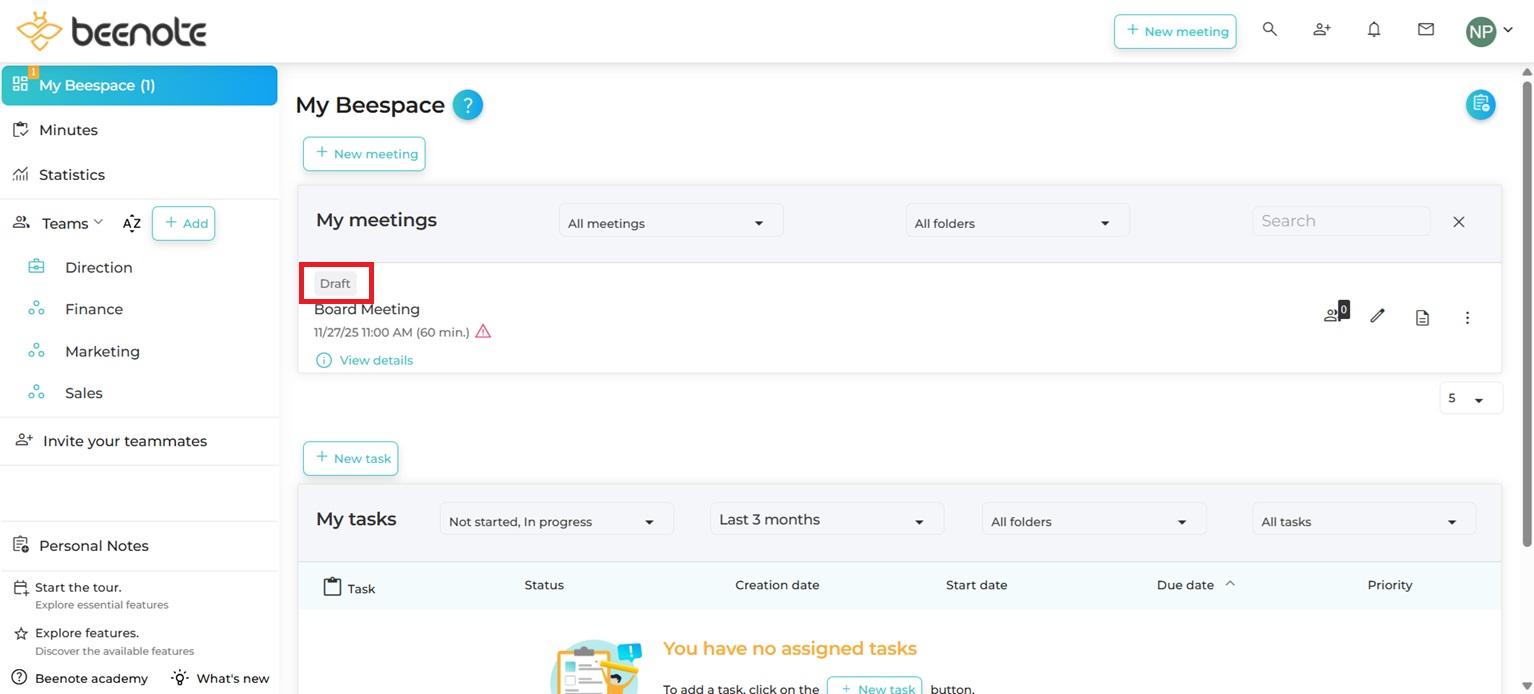
Once you have saved your agenda, you will see its status, draft or confirmed, on the meeting in your Beespace.
You can change the content and status at any time using the pencil icon.
Note: Only the leader and partners can edit the agenda.
![]() Next steps
Next steps
View the Agenda: View the agenda before your meeting to be prepared
Move a meeting: Change the date of your upcoming meeting
Start and Hold a Meeting: Get your meeting started right

