

How can we help you?
Face-to-face and Advance Voting
Note: The Vote is a Beeboard feature.
![]()
The vote allows to reinforce and document a decision on a specific subject. In fact, it helps to make quick and justified decisions while involving team members. Voting can be done in two ways: during a meeting or in advance.
What you will find in this article:
- Accessing the vote
- Create a vote in the agenda
- Adding an unscheduled vote during a meeting
- How to create an advance vote
- Edit, cancel, or delete
- How to manage the voting process
- Make a decision after the results of the vote (Adopt, Reject or Postpone the decision with a vote)
- Voting results in the minutes
- Voting results in the decisions register
All the voting features
Here are all the features and icons to identify in relation to voting when creating the agenda, during the meeting, or during advance voting. Whether it is to create a vote, make changes or delete it, several different functions are essential to know.
When you create it

1. Voting subject
2. Voting users
3. Number of accepted answers (one or many)
4. Checkbox for Allow anticipation vote
5. Add option ![]()
6. Delete
7. Create a vote ![]()
8. Close

When you want to modify it
9. Edit with the editing pencil![]()
10. Vote options (add, edit or delete with the trash)
11. Confirm the changes with ![]()
12. Delete the vote (trash can in the upper right corner of the window)
13. Keep the vote (do not delete it)
During the vote

14. Start vote ![]()
15. Vote ![]()
16. You have voted![]()
17. Cancel the results of the vote ![]()
18. Vote completed ![]()
19. Ending voting now ![]()
How to vote
You can vote during the meeting or in advance. First, you must be a member of a Beeboard team and be invited to a meeting.
During that meeting, you must be logged in to Beenote and participate in the appropriate meeting. In addition, you must be a leader, partner, or attendee and be added as a voting user in order to participate.
N.B. Please note that voting is not available to guests but this does not prevent them from following the meeting and seeing the results. However, they have 24 hours to consult the minutes and access the Beenote application after the meeting.
During a meeting
First, you must be logged into the meeting. Then, when the meeting has reached the topic that contains the resolution and vote, you can select the Start Voting button to participate.
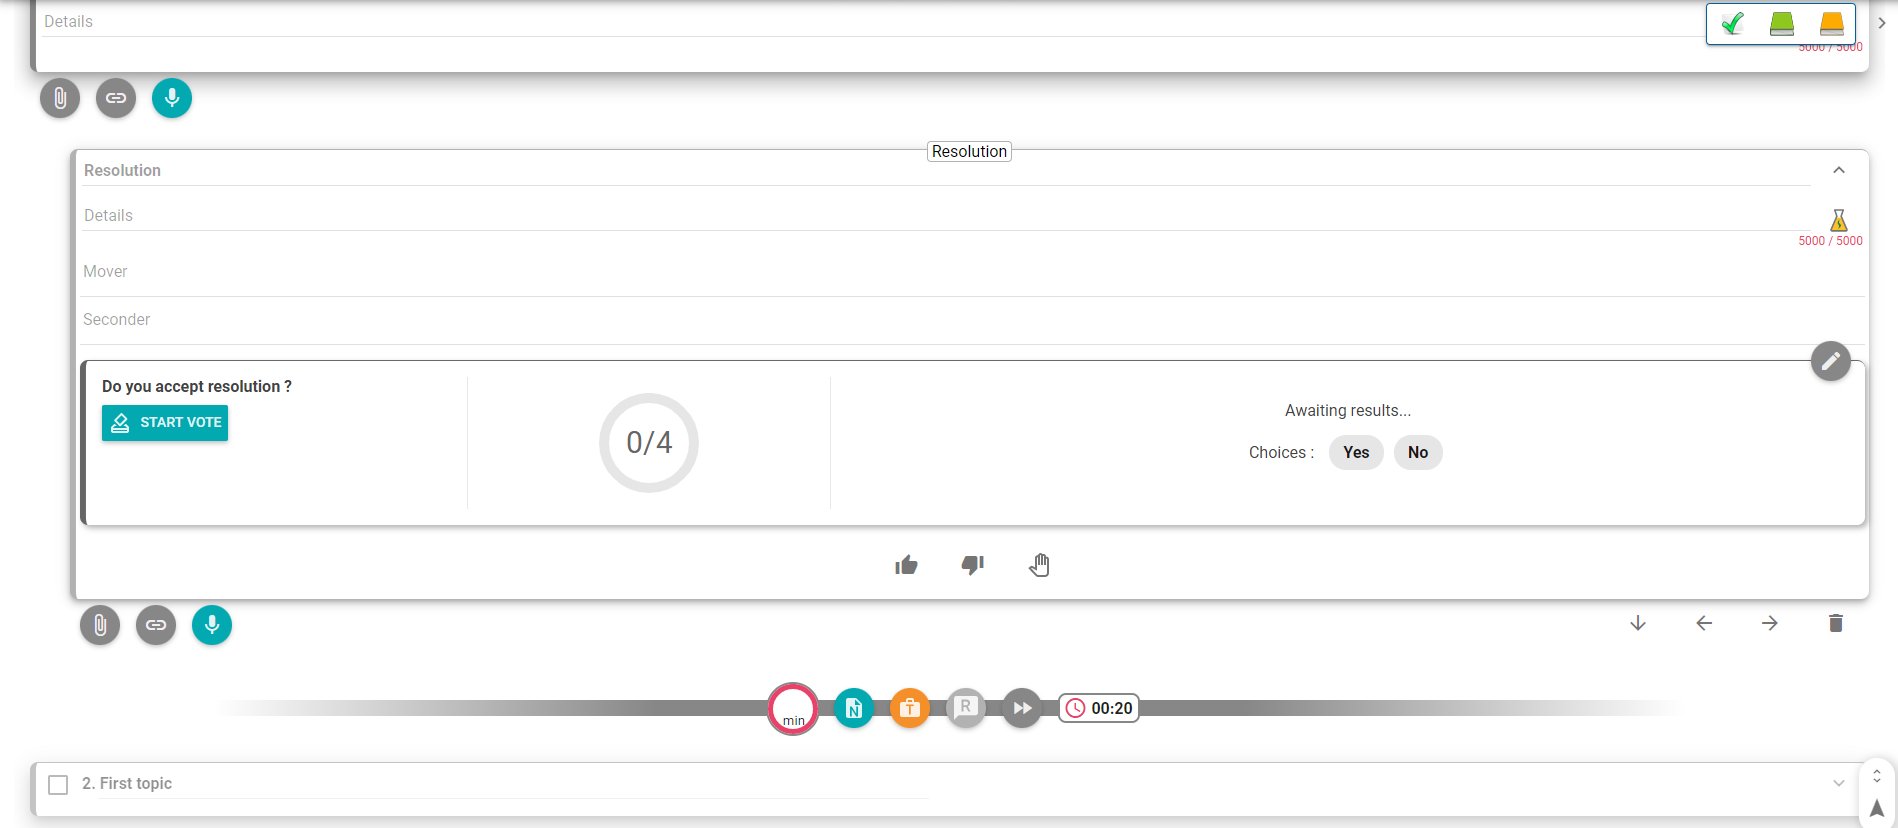
A second window will appear showing you the subject of the vote and the options for choosing it.
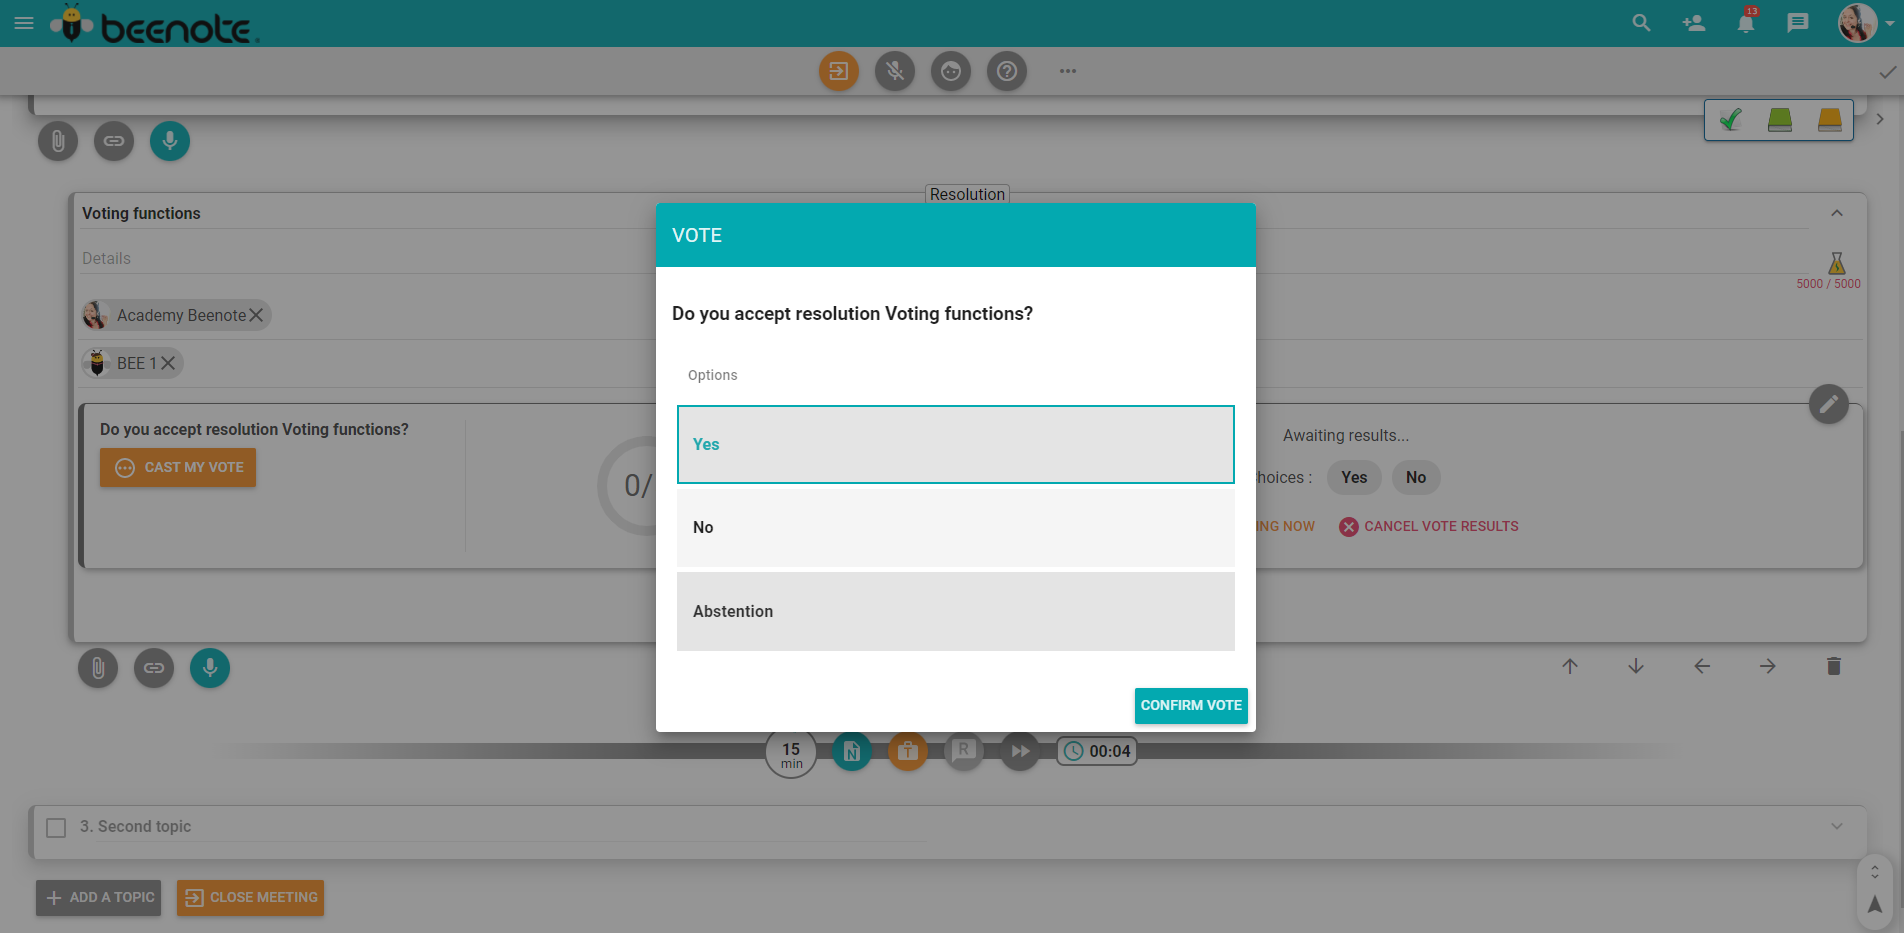
Take time to think about your choice as it cannot be changed unless the manager decides to start over.
Then, press the option that suits you for this topic.
Then Confirm the vote.
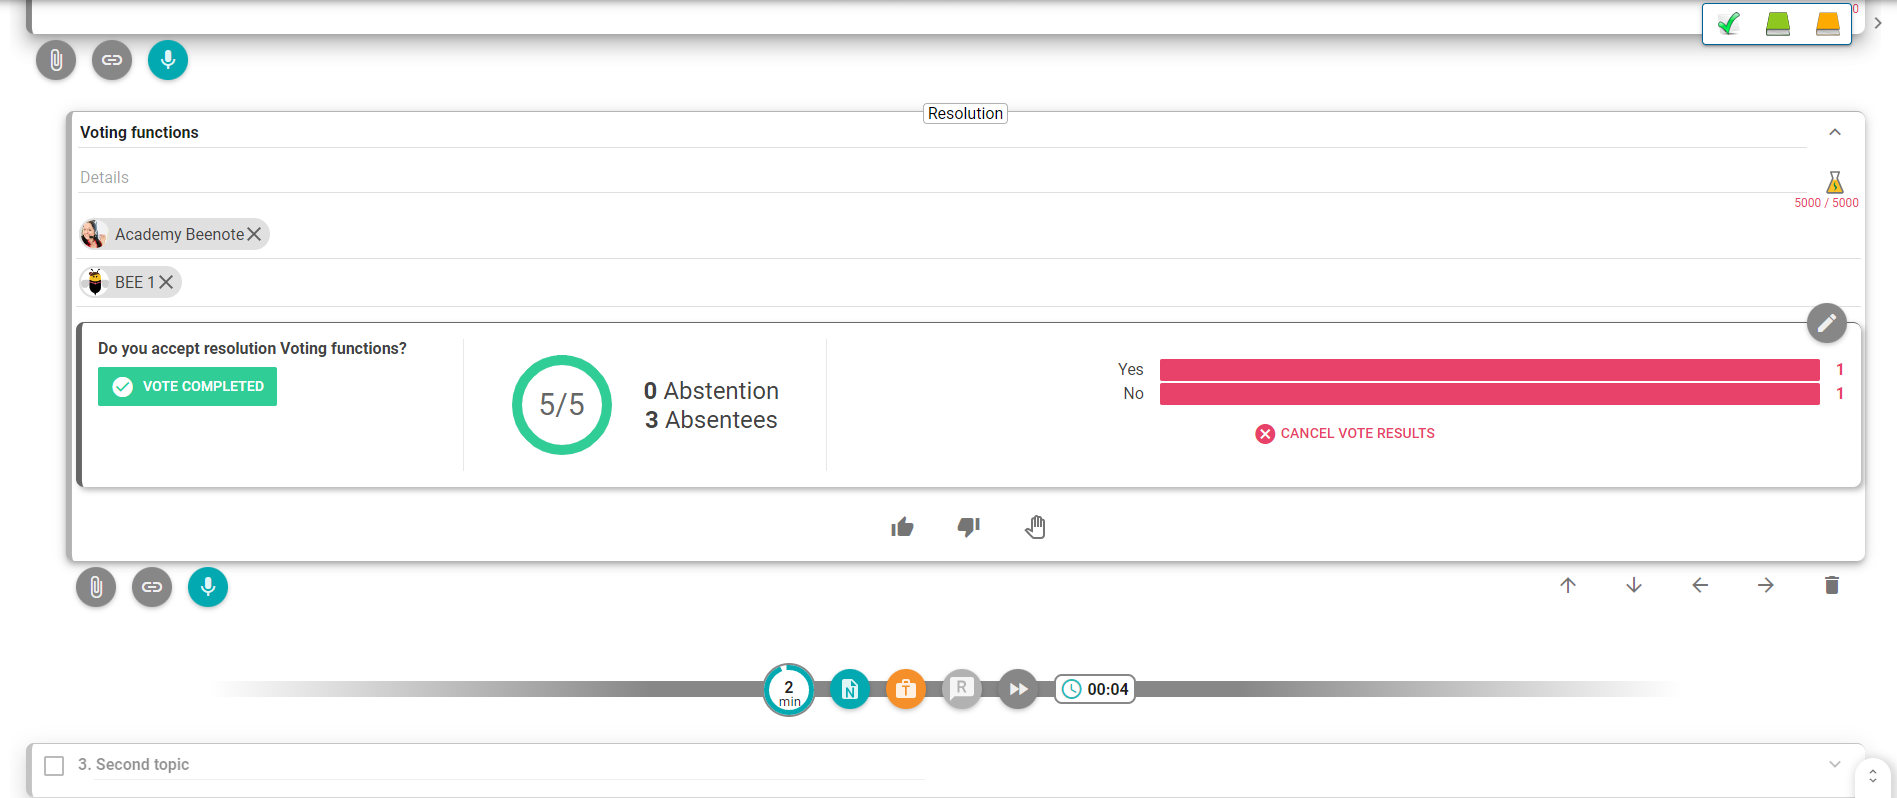
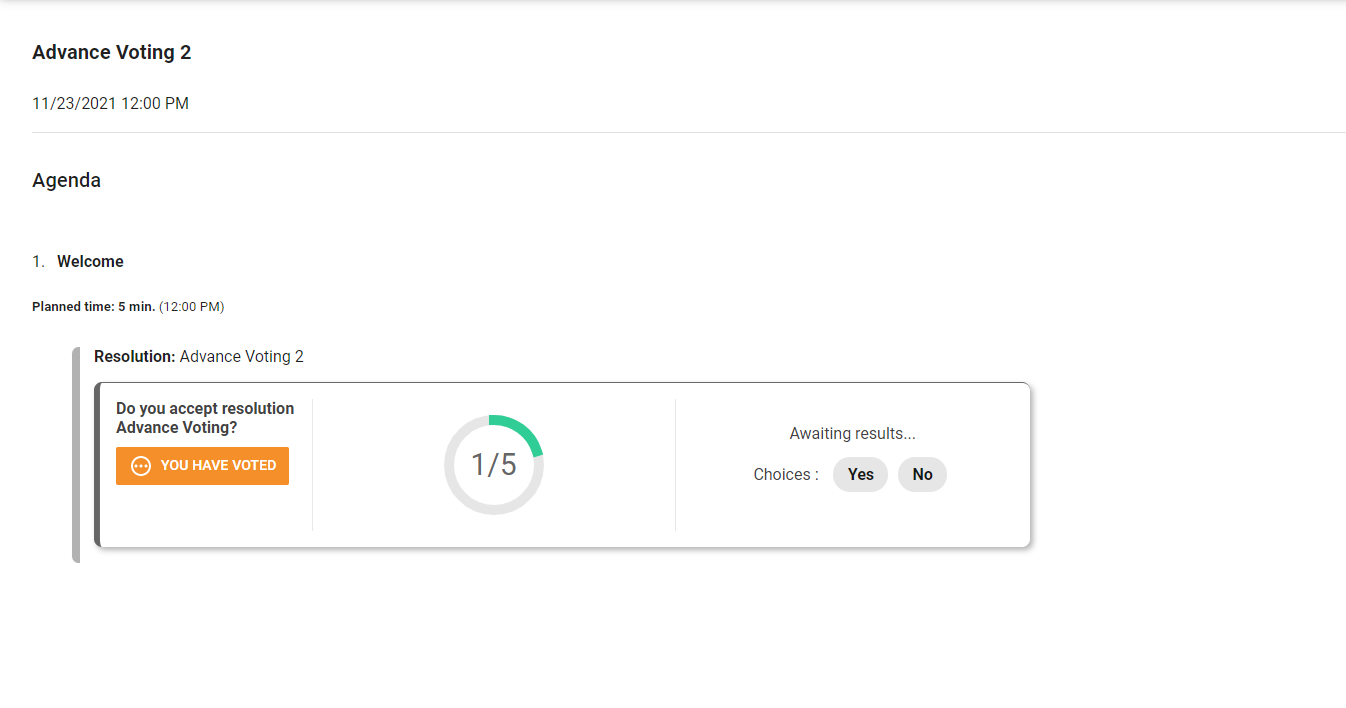
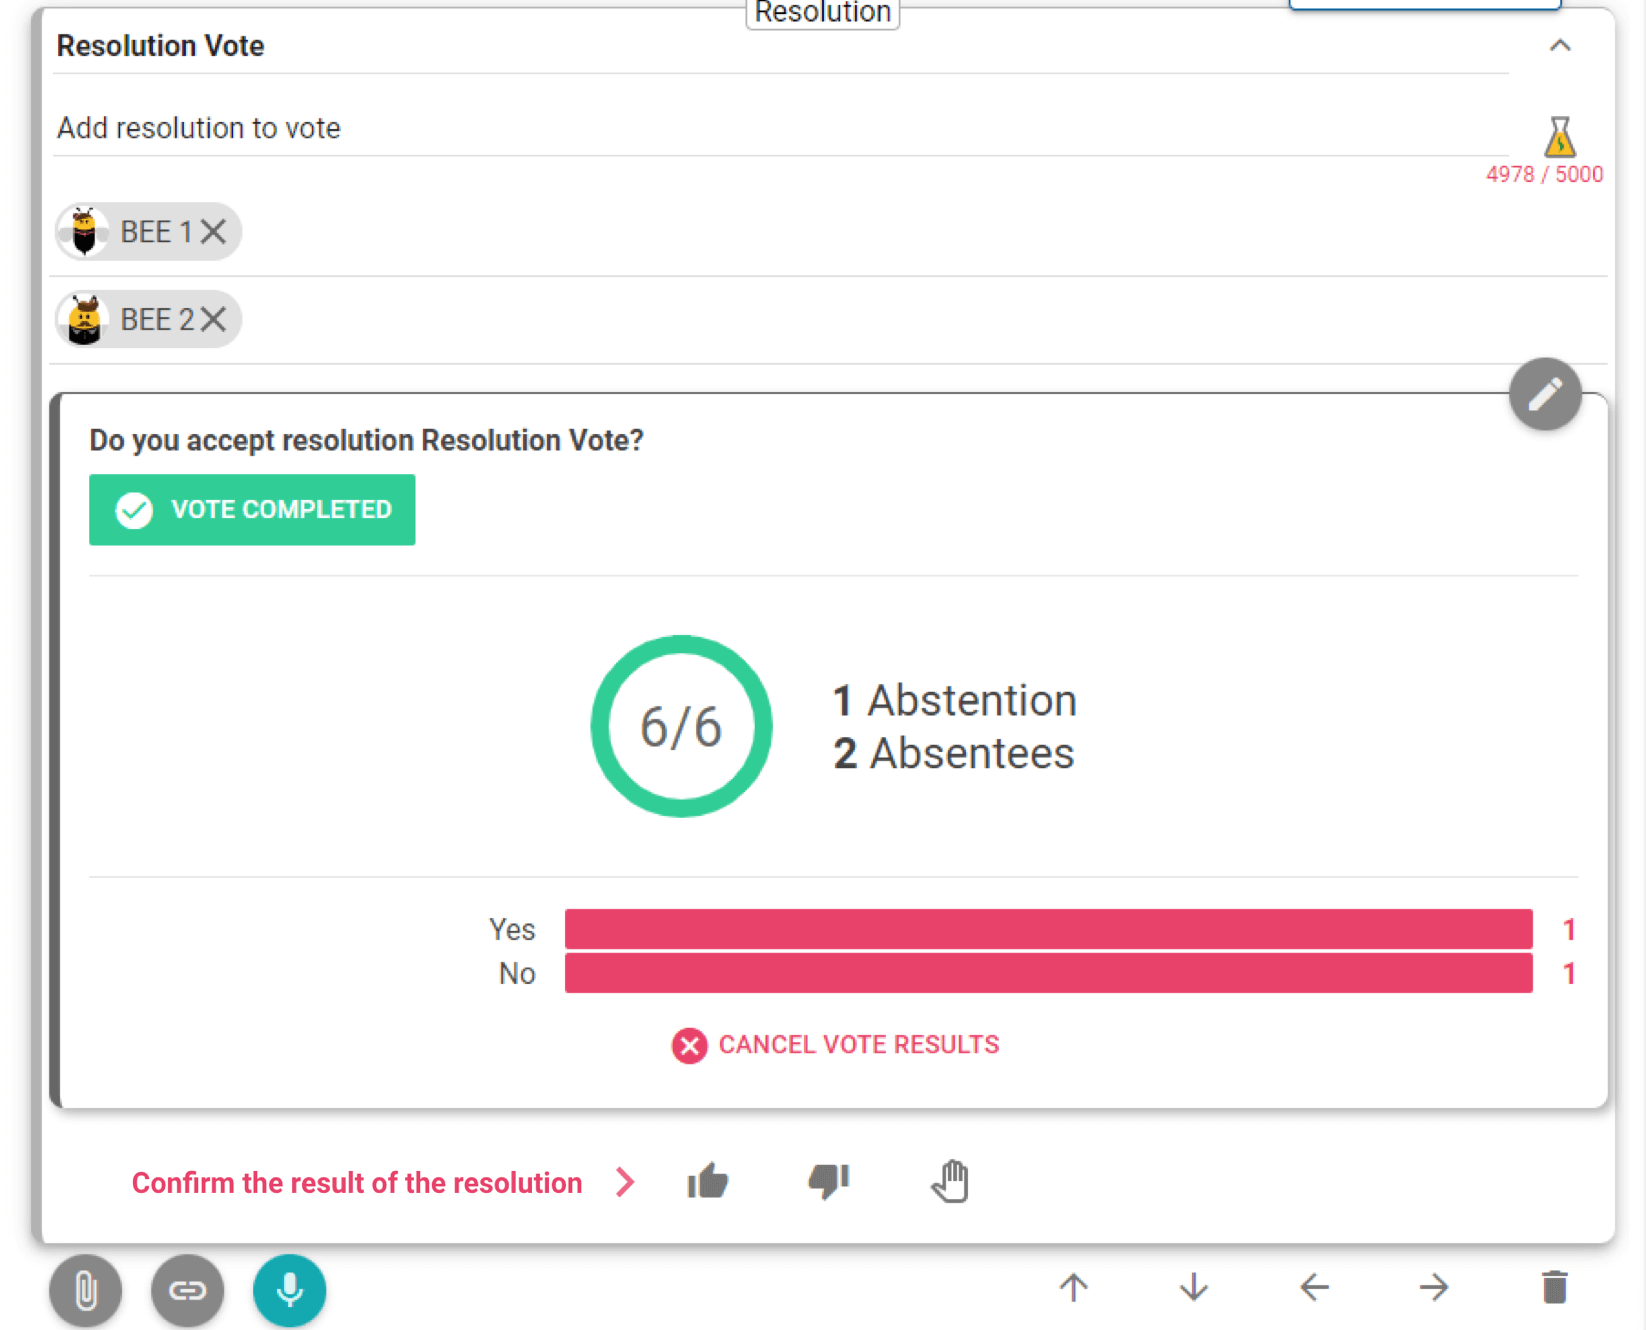
This will take you to the meeting topic containing the current resolution and vote. It will show that ![]() and the number of people remaining to cast their vote.
and the number of people remaining to cast their vote.
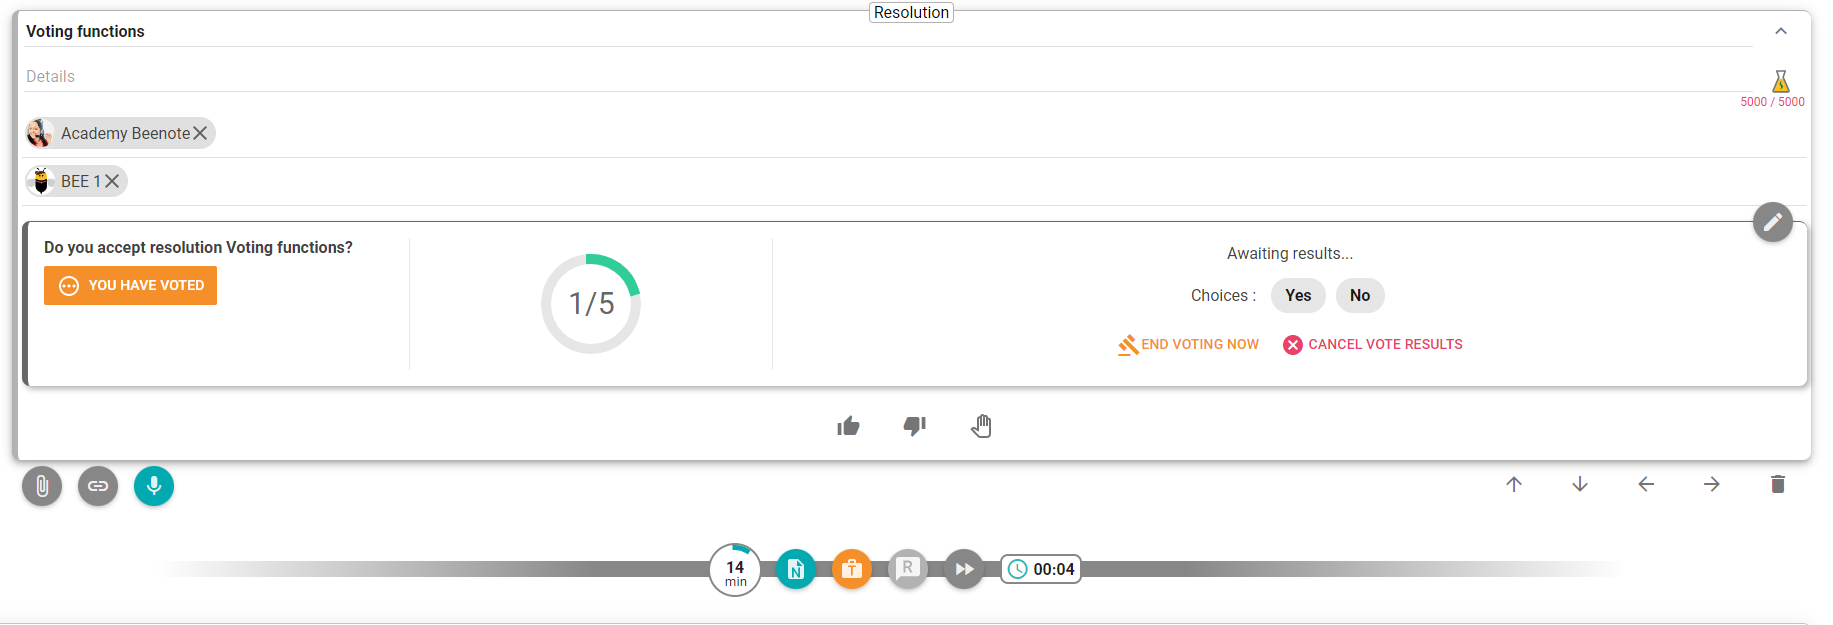
When the vote is completed there will be the box ![]() . You can see the information and results as:
. You can see the information and results as:
– If the vote is completed,
– The number of votes, abstentions, and absences,
– The results by choice.
In advance
For advance voting, you can vote in advance on a specific issue that requires a quick decision and time to hold a meeting is not possible.
Simply send an invitation for a meeting that will contain only the advance vote and the necessary documentation so that members can implement their vote without holding a meeting.
This way, your vote will be recorded and taken into account. All the organizer has to do is start the meeting alone and complete it, so that everything is recorded and complies with the governance standards on voting.
Here is the procedure for advance voting:
1. Log in to Beenote here or by using the link provided in the invitation email.
2. Select the meeting where you need to conduct advance voting.

3. You will see the entire agenda. Click on ![]() .
.

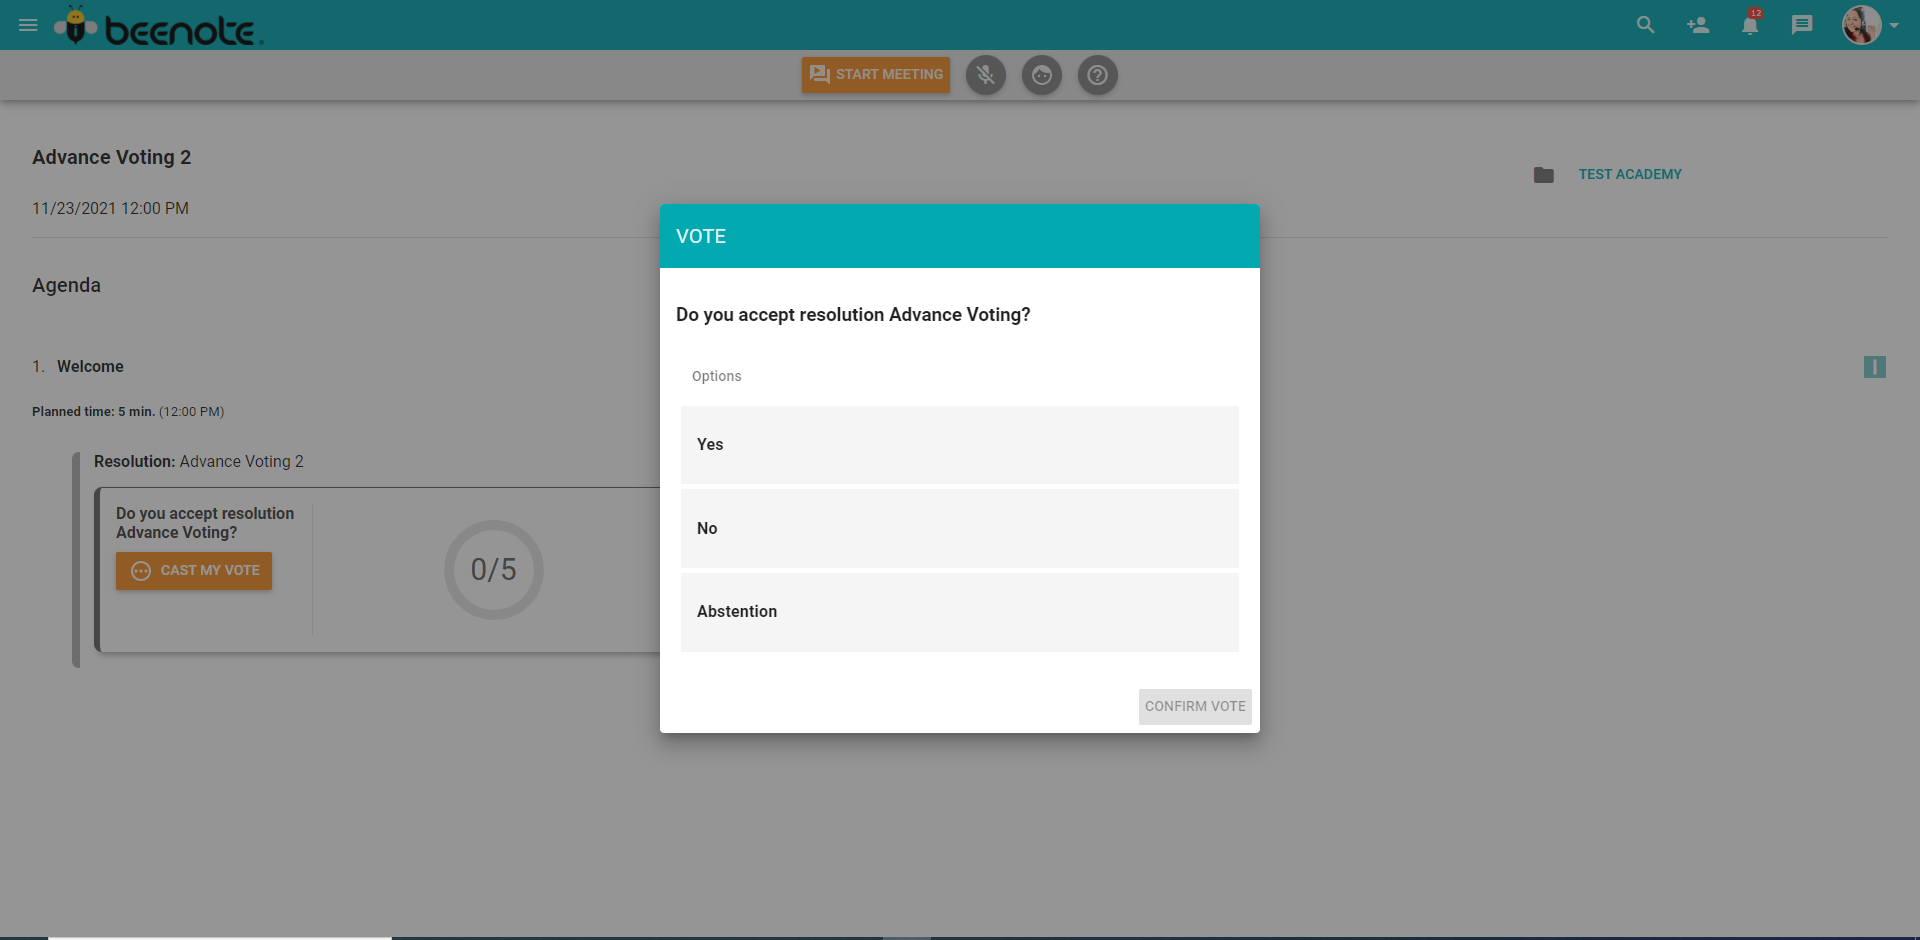
4. A second window will open with all the choices.
Select your choice and press Confirm Vote.
Afterward, you can see that your vote has been cast by seeing the icon ![]() and that there are more results to come.
and that there are more results to come.
Voting management
Accessing the vote
In order to access the voting function, you must first create a resolution in the agenda or during a meeting. Then you will have the possibility to include a vote and to determine the choices of answers of this one.
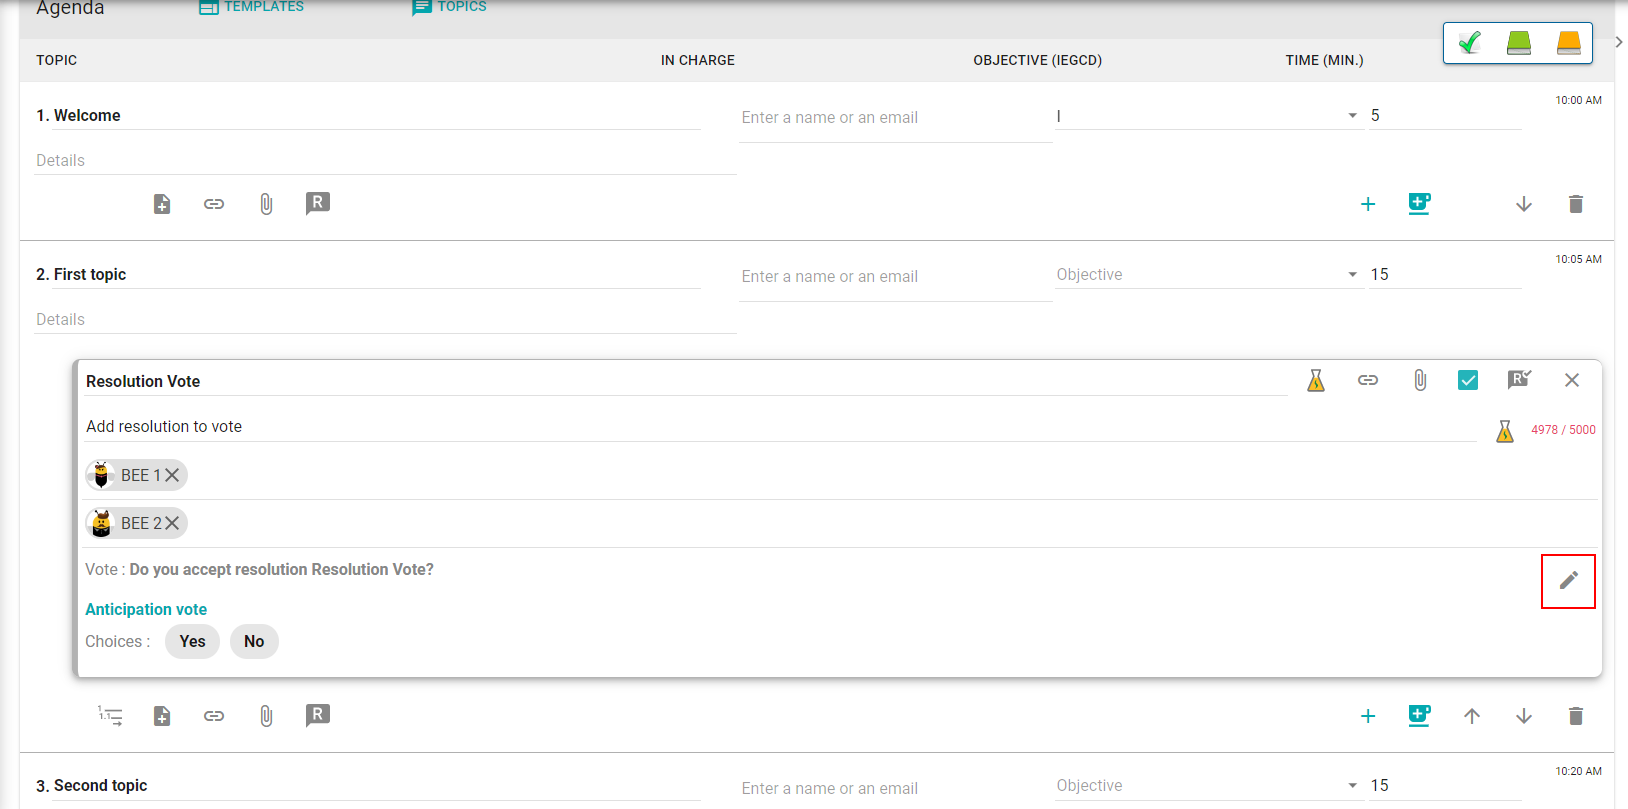
During the creation of the agenda, the voting icon is found in the resolution, in the upper right corner of the window.
During the meeting, the vote will automatically be displayed at the location where it was created during the development of the agenda.
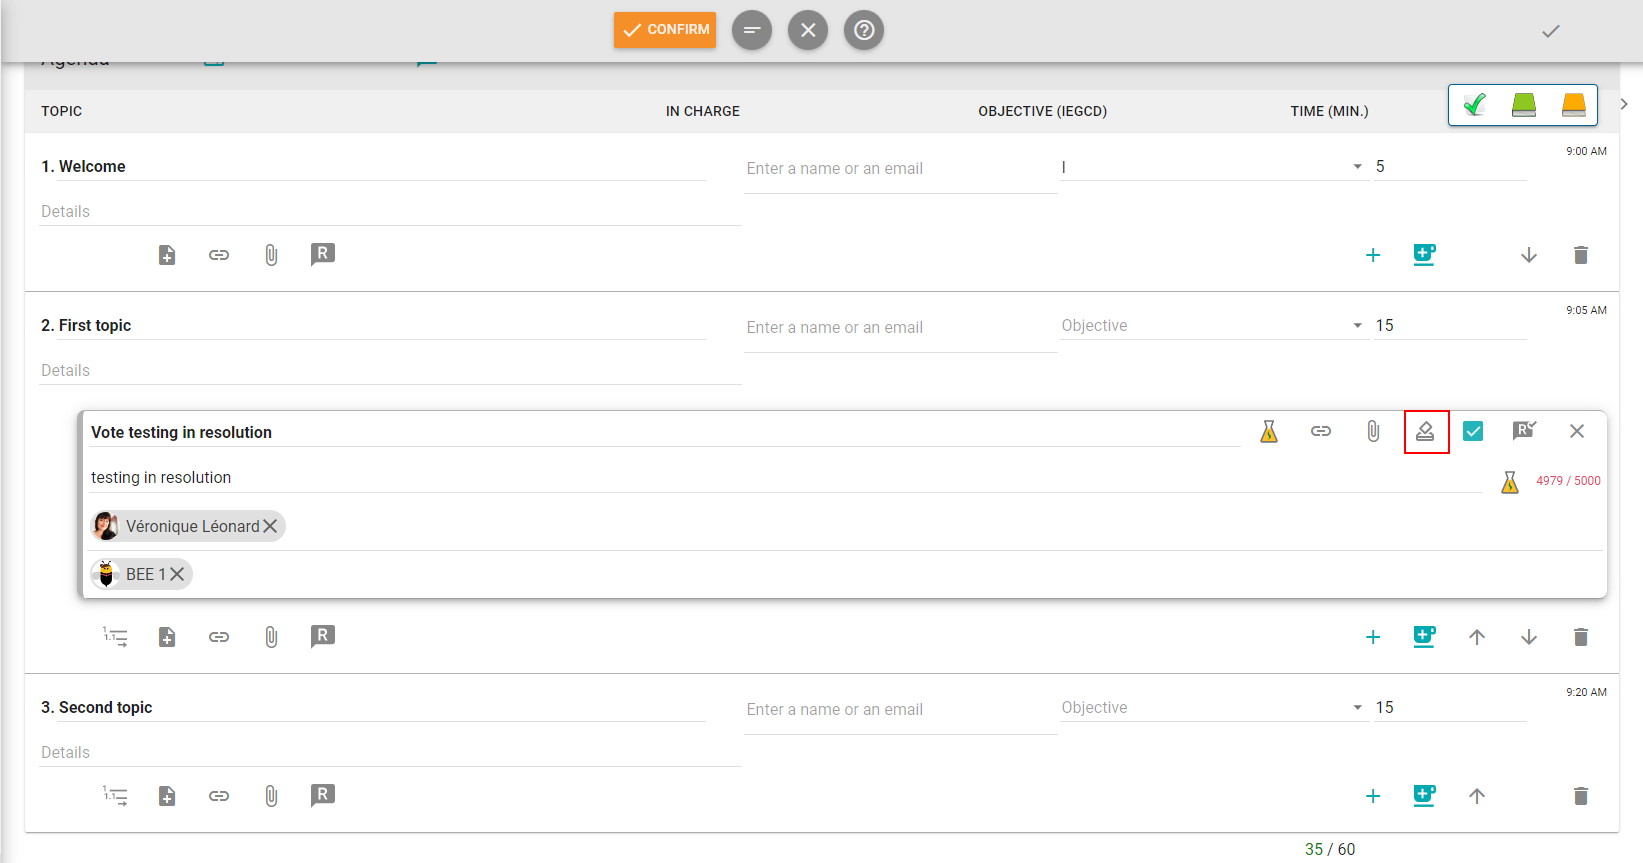
When a vote is added during a meeting, a resolution should be created by selecting the icon ![]() at the bottom of the topic window.
at the bottom of the topic window.

Then, you must choose the option to ![]() which will appear at the bottom left of the resolution window.
which will appear at the bottom left of the resolution window.
To learn more about > What is the best way to organize tasks from Beenote?
Create a vote in the agenda
When creating the agenda, to include a vote you must:
1. Create a topic.
2. Then, include a resolution in it by pressing the ![]() at the bottom of the topic window. Then, you have the choice of selecting an existing resolution in its register
at the bottom of the topic window. Then, you have the choice of selecting an existing resolution in its register ![]() or adding a new resolution
or adding a new resolution![]() .
.
3. Add the vote by selecting the icon ![]() in the upper right corner of the resolution window.
in the upper right corner of the resolution window.
This will give you the option to include a vote and determine the response choices for the vote.
The Create Vote window will appear.
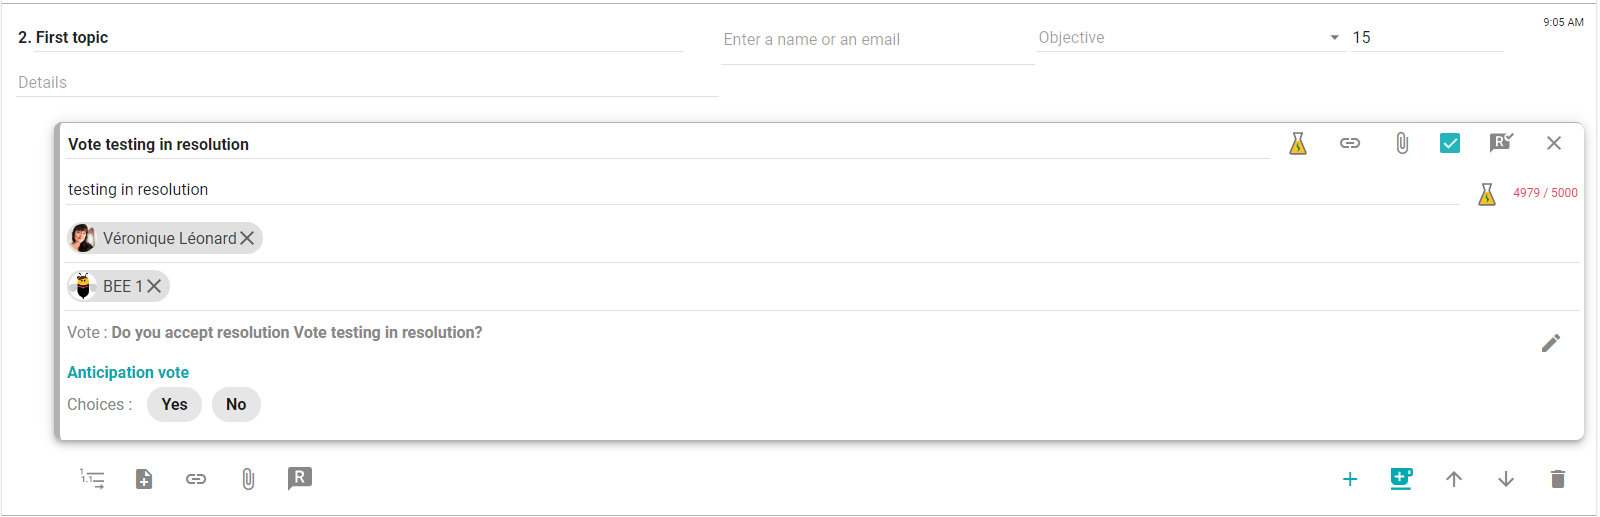
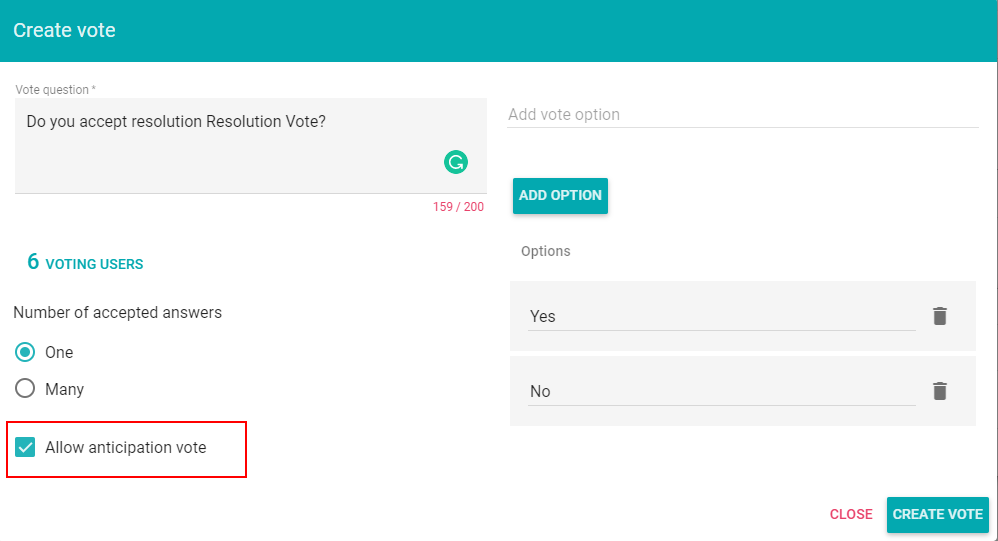
4. Then, indicate the subject of the vote. There will be an automatic response to make it easier for you to write. However, you can also change the subject as you wish.
5. Next, you need to select the voting users who will be able to vote. You can select all users (All), partially, or remove users (None). As long as the minimum number of one user is met in order for the vote to exist.
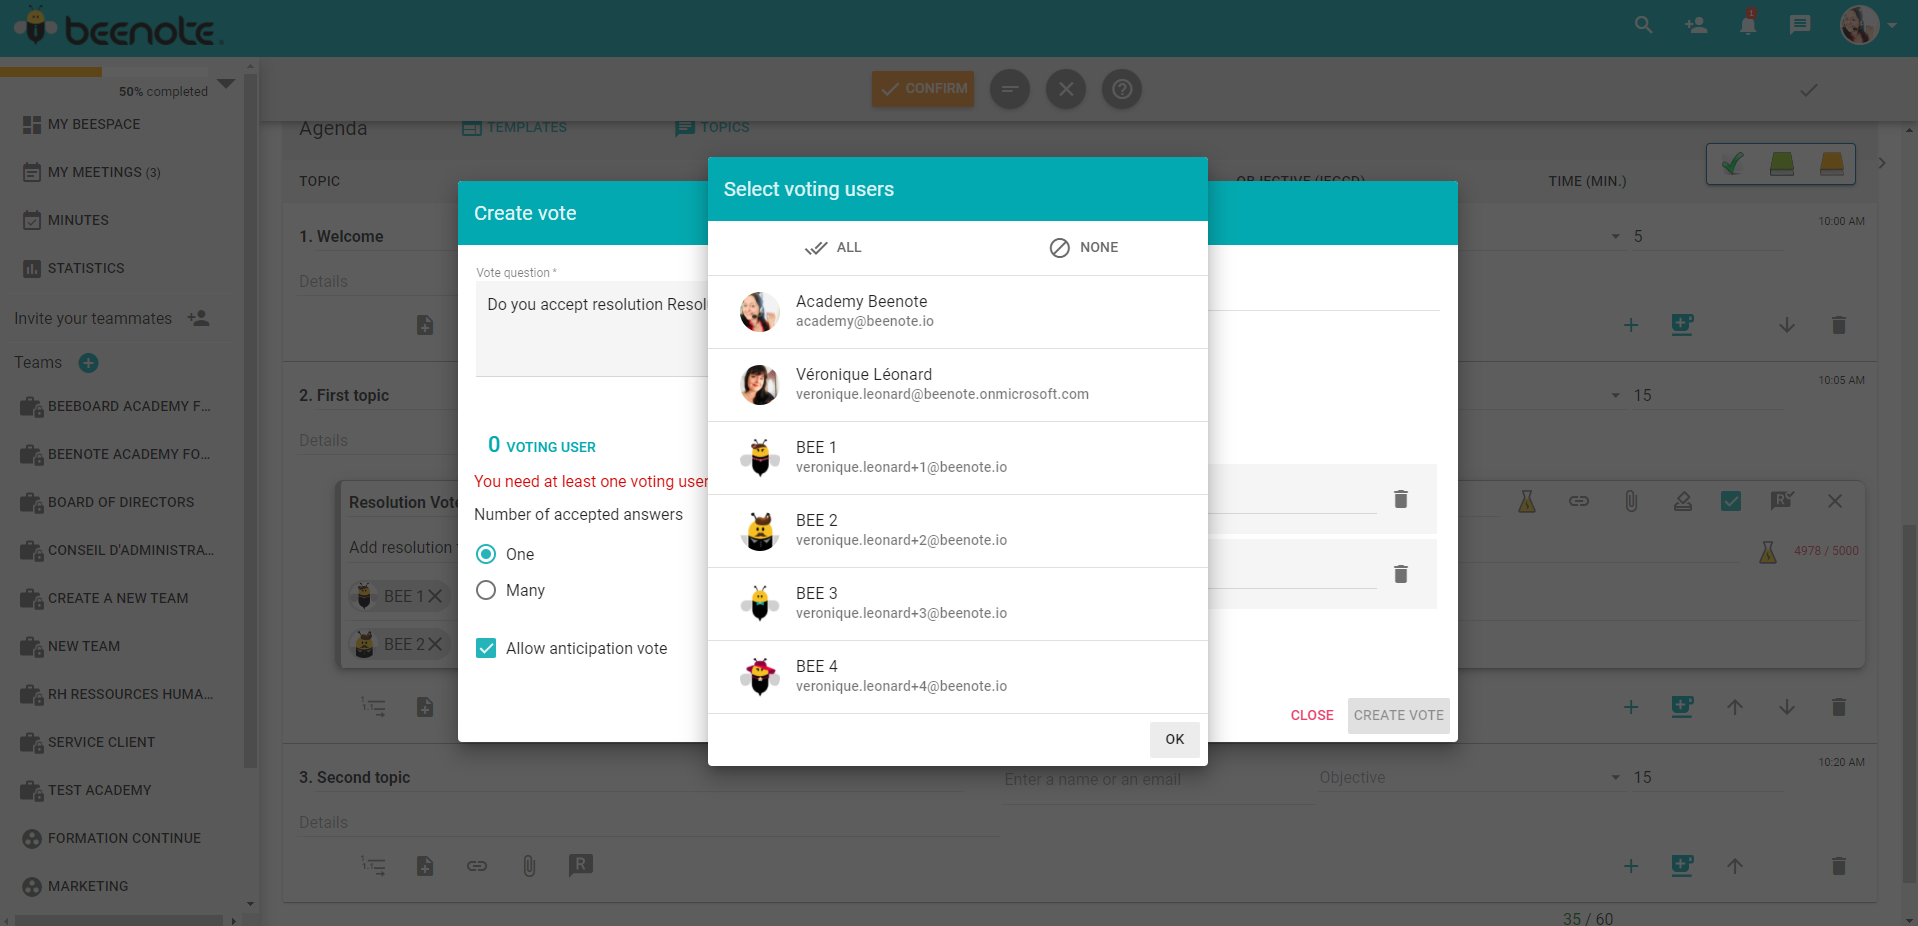
6. Then, choose the number of accepted answers (one or more) according to the type of vote you wish to make.
7. If you wish to create an advance vote, simply check the appropriate box. Otherwise, the vote will be executed during the scheduled meeting.
8. In addition, it is possible to add a voting option by writing the choice and pressing Enter on your keyboard or the key ![]() on the screen. They will then be displayed with the other options.
on the screen. They will then be displayed with the other options.
The yes, no, and abstain choices will be offered automatically when creating a vote, but you can also decide to remove or modify them.
Also, you can delete the options by pressing the trash can on the right. To cancel the changes or the vote press Close.
9. Finally, to save and create the vote in the agenda, press ![]() .
.
Add an unscheduled vote during a meeting
To add an unscheduled vote during a meeting, create a resolution by selecting the icon at the bottom of the desired topic window.
Then, you must select the Create Vote option at the bottom left of the resolution window.
Now you just have to fill in the information in the window and press Create Vote.
How to pre-voting?
When you create it, you have the option of a checkbox to enable advance voting.
If you wish to disable this feature, just make sure the box is unchecked.
Edit, cancel or delete
It is possible to modify, cancel or delete all the information in the vote. Just select the edit pencil icon ![]() in the agenda, in the upper corner of the voting window.
in the agenda, in the upper corner of the voting window.
Thereafter, you can modify :
– The subject of the vote
– The voting users
– Change the number of accepted answers
– Check or uncheck the advance voting box
– Add, edit or delete options
– Save changes with the Edit Vote button or
– Cancel changes with the Close button
– Delete the entire vote by pressing the trash can in the upper right corner.

How to manage the voting process
The procedure for handling the vote is quite simple. The person who creates the vote must do so as indicated above in the section create a vote in the agenda. She will only have to cancel the results or end the vote.
Note that the leader and partners can manage the vote but do not need to be designated as voting users.
Make a decision after the results of the vote (Adopt, Reject or Postpone the decision with a vote)
Since the vote is part of a resolution, it is important to make a final decision based on the results.
There are three choices: ![]() Adopt, Reject or Postpone the decision. At the bottom of the window, all you have to do is select your final decision choice.
Adopt, Reject or Postpone the decision. At the bottom of the window, all you have to do is select your final decision choice.
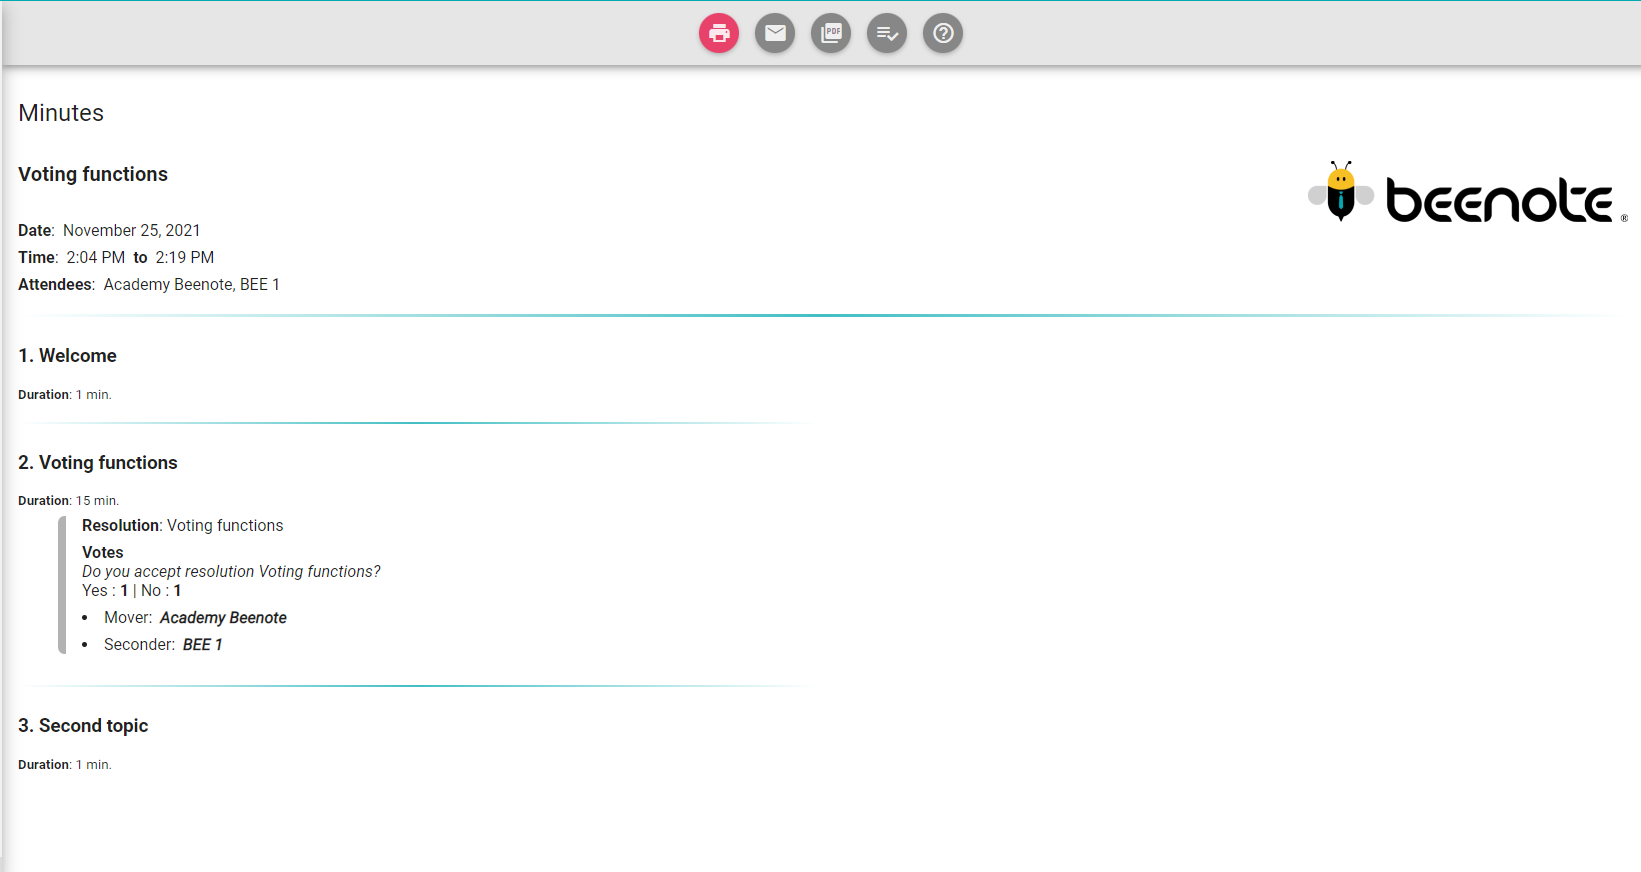
Voting results in the minutes
When creating the minutes, it will be possible to read them and see if it is a resolution or a decision, the question asked, the results of the vote as well as the mover and seconder of this vote.
Voting results in the decisions register
In the decision register, you can search by date and check if there was a vote in the decision. If this is the case, you will have the information Voted to specify that there was a vote to accompany the decision and who created it.

![]() Next steps
Next steps
Resolution Register: Get more information about how resolutions are handled
Decision Register: Track resolutions that have been converted to decisions upon adoption
Library: Store your important documents in the library in a secure way